

Creating & configuring products
You know how to create new products of every type in the inventory, set prices, link categories and availability, and configure products for automations.
The inventory is the central product database in Univents. Every product that appears on a booking page, is included in a quote, or ends up on a function sheet must be created here first.
In the video you build the catalog: the two-level category tree, how a product is structured, and the checkboxes that turn a product into a rental item, a package or a recipe.
You’ll find the individual steps written out below as well.
Opening the inventory and understanding the tabs
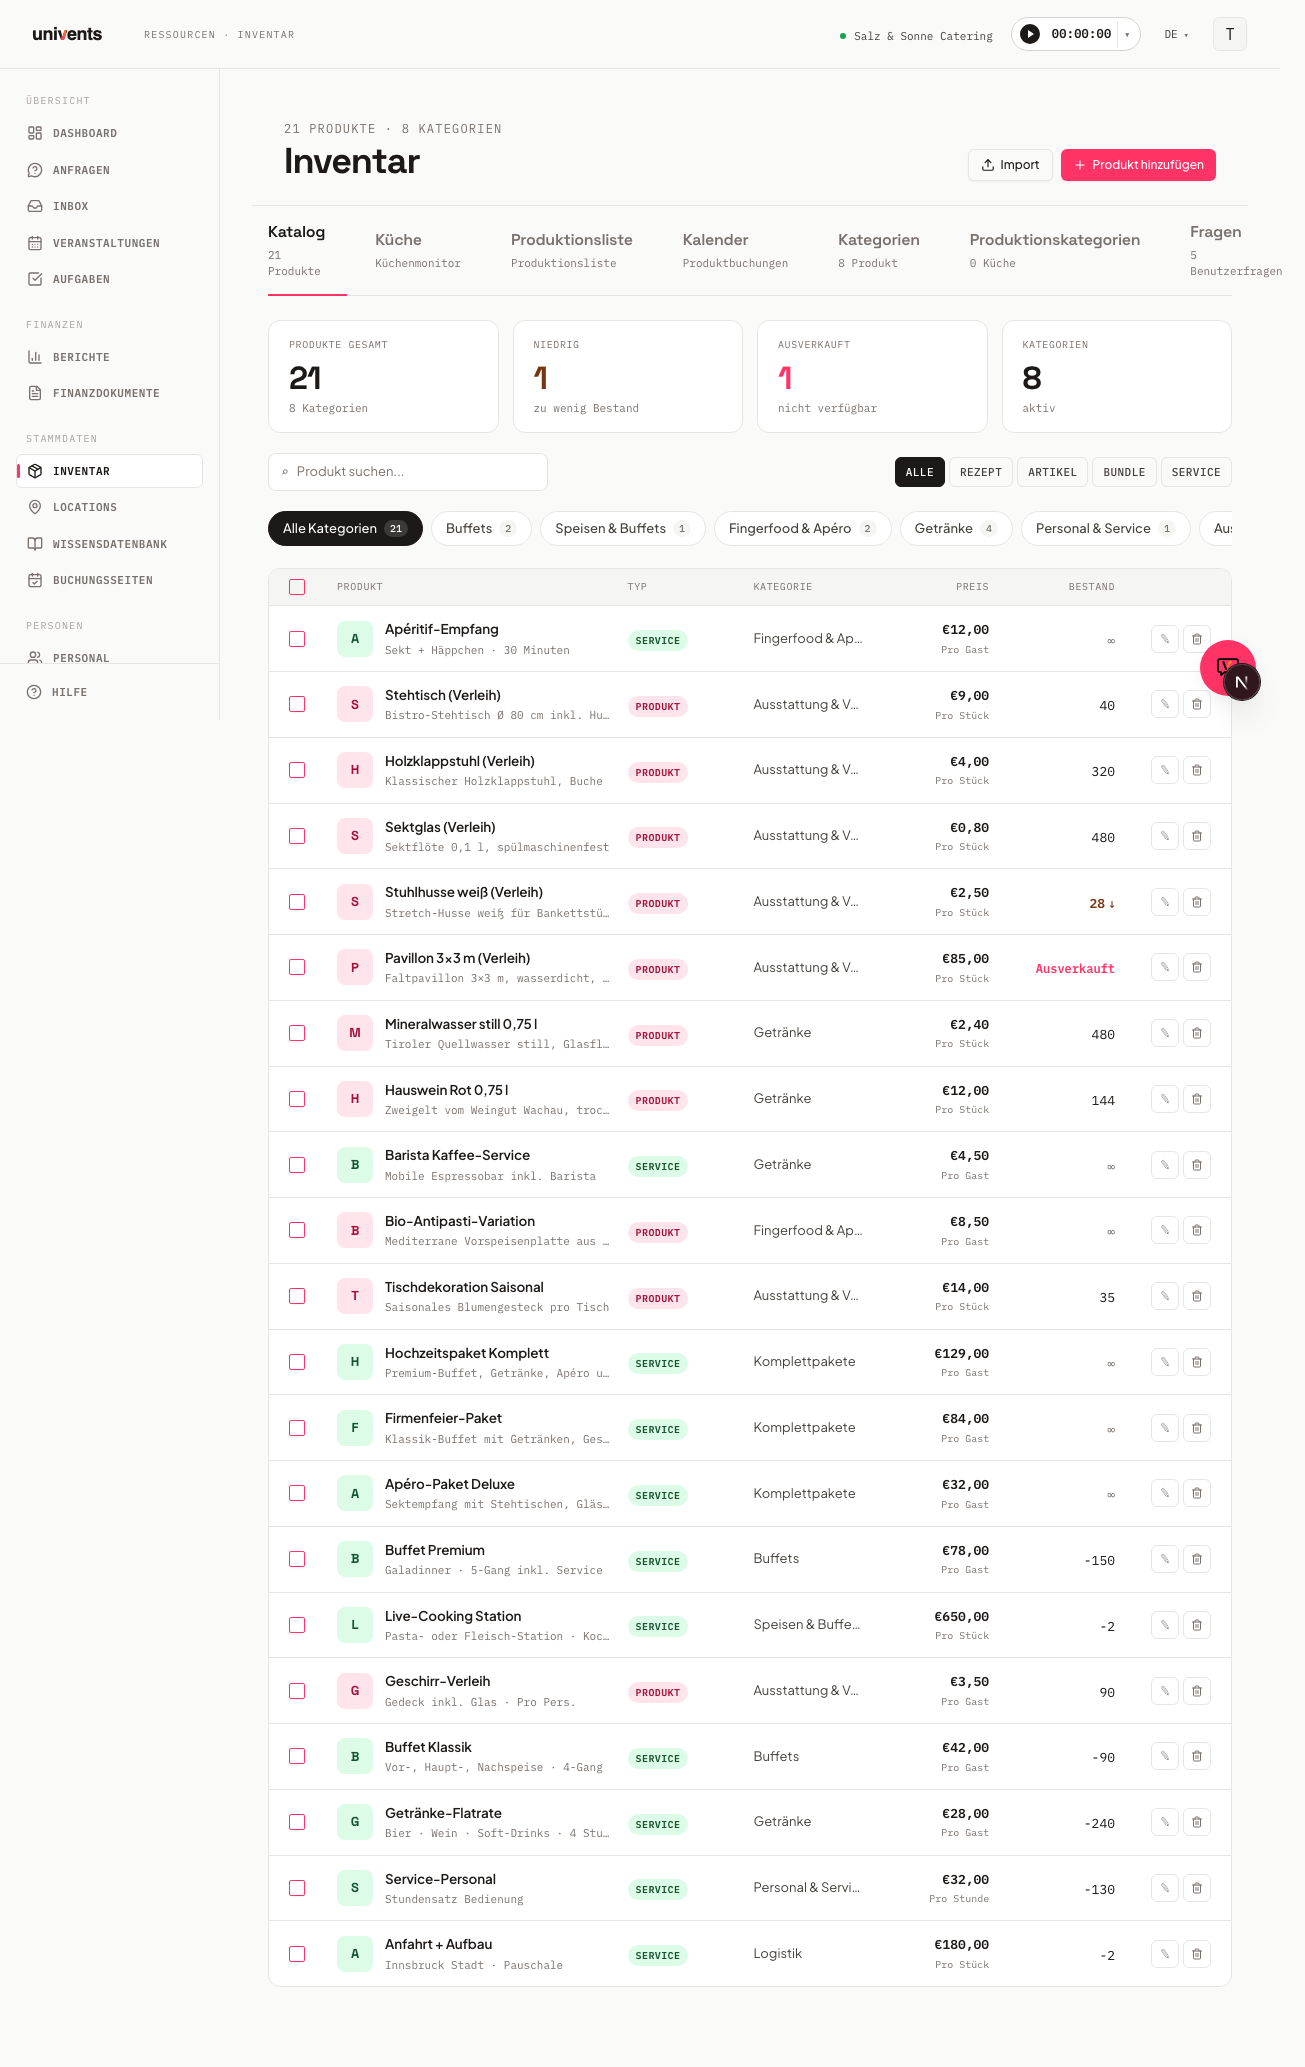
You can reach the inventory in the left-hand navigation under Inventory. The page shows a tab bar at the top with seven sections:
- Catalog — list of all products with search, type, and category filters
- Kitchen — kitchen monitor for active production tasks
- Production list — aggregated production overview by event or category
- Calendar — calendar view of all booked products
- Categories — manage product and booking page categories
- Production categories — structure the kitchen monitor
- Questions — reusable customer questions for booking pages
In day-to-day work you will spend most of your time in the Catalog tab.
Creating a new product
Click Add product in the top right. A dialog opens for selecting the product type. Choose one of the five types:
| Type | When to use |
|---|---|
| Recipe | Food and drinks produced in the kitchen. Ingredients and allergens can be stored. |
| Item | Physical objects such as furniture, décor, or equipment. |
| Bundle | Multiple products as a unit — e.g. a drinks package made up of several individual items. |
| Rental | Items available for hire, such as a projector or photo booth. Stock is only reduced for the duration of the booking. |
| Service | Services such as staffing, setup, or transport. |
After selecting the type, Univents immediately creates a draft and opens the product editor. You can fill in all sections right away without having to save the product first.
Basic data
The first section in the left-hand sidebar of the editor is called Basic data. Enter the core information here:
- Optionally upload a Main image (click or drag to upload). Ideally use a 4:3 photo, e.g. 1600 × 1200 pixels as JPG — details in Image sizes for products, webshop & locations.
- Enter the Name — visible to customers on booking pages and financial documents.
- Fill in the Internal name — only visible internally; controls sort order in lists.
- Select a Category from the dropdown, or create a new one directly by clicking the plus button.
- Write a Description — appears on booking pages, quotes, and invoices. You can format it: bold, italic, bulleted and numbered lists and coloured highlights. When you add the item to a quote, the formatting comes along and is printed in the PDF exactly that way; you can keep editing it on the line item.
- Set the Billing model: Per unit, Per guest, Per hour, Per kilometre, or Per guest/hour. The model determines how quantities are calculated automatically on quotes. Where the quantity comes from: Per guest uses the event's guest count, Per hour its duration, and Per kilometre the Distance (km) field in the event's "Date & venue" step. That distance is calculated automatically on save, from your company address to the event address, provided an address is stored under Settings → Company; you can override it at any time. If the event comes from a booking page, the field already holds the driving distance from the page's origin address to the customer's address and is not recalculated. If the field is empty, the position is billed with a factor of 1 — the document editor flags this on the affected position; enter the distance manually in that case. You get the same note for "Per guest" when the event has no guest count. When a quote or invoice contains such a position, the distance also shows on its Event location card, where Edit lets you change it without leaving the document.
- Optional: Color (for the calendar). The product's Unit (formerly "Alternative unit") and its content (e.g. 1 bottle = 1,000 ml) are set under Price & stock, right next to the package and the purchase price.
For the types Recipe, Bundle and Service, the SKU field also sits here. Those three types have no Inventory section, which is where the SKU otherwise lives — so for them you will find it directly in the basics. For Item and Rental it stays under Inventory as before.
For Item and Bundle the basics also hold the Nutrition facts block below Allergens & Dietary: on an item its own values per 100 g or per 100 ml, on a bundle the automatically calculated total of its components. How this works in detail is explained in Maintaining nutrition values and calculating them for recipes.
You can maintain multilingual names and descriptions using the Languages toggle at the top of this section.
Recipe details (only for type "Recipe")
For products of type Recipe, the sidebar shows an additional Recipe section, split into Allergens & Dietary (always visible) and further fields that appear once you enable kitchen production.
Always visible:
- Allergens — enter as tags (press Enter to confirm)
- Dietary information — e.g. vegan or gluten-free, also entered as tags
- The Add all from ingredients button is still greyed out — it names the planned bulk route for recipes; for now you maintain the ingredients one by one in the Ingredients area right below, and the recipe inherits the allergens by itself
- Nutrition facts — the automatically calculated total of the ingredients, per portion and per 100 g (see Maintaining nutrition values and calculating them for recipes)
- Ingredients — once the product has been saved, link ingredients from your inventory here. If an ingredient carries allergens, they appear on the recipe under Inherited from ingredients right away — with the first ingredient and after every change to the ingredient list. Dietary information is not inherited (see Creating & using recipes)
Enable Use for kitchen production to unlock further fields:
- Timing & shelf life — Shelf life (days), Prep time (hours) (start production at the latest X hours before delivery; 0 = same-day prep), and Production type (In-house or External)
- Recipe — Recipe images, Production category (with an optional sub-category — create new categories directly via the plus icon), a free-text Recipe field, and Notes
The checkbox controls the kitchen monitor only. A recipe always gets its own row on the production list — the Produced in the kitchen toggle under Master data is enough for that.
If shelf life, prep time, or production type are missing while kitchen production is enabled, Univents shows a warning: without them the kitchen monitor cannot schedule when the dish has to be produced. The recipe still appears on the production list.
Inventory & logistics (only for type "Item" and "Rental")
For products of type Item or Rental, the sidebar shows the Inventory section:
- Identification — SKU and Barcode
- Storage — Storage location (since September 2026 the package lives under Price & stock → Unit, content & package)
- Dimensions & Weight — Weight (kg), Height (cm), Width (cm), and Depth/Length (cm)
- Power — Voltage, Wattage, and Power connection, useful for technical rental equipment such as projectors or lighting rigs. The Power connection field shows an example and asks you to include the amperage (“CEE 16A”, “Schuko”) — so the kitchen knows which circuit an appliance needs before setup starts
Bundle contents (only for type "Bundle")
For products of type Bundle, the sidebar shows the Bundle section:
- Enable Include components in the quote description so the booked components (names only) appear in the description of the bundle line in open quote and invoice drafts. If a component was deselected or swapped in the document, the adjusted state is listed, not the list from the inventory. This only applies to lines that already carry such a list, i.e. lines created with the switch on; for lines created before that, add the line again. Documents that were already sent stay unchanged.
- Under Bundle Components you add the individual products that make up the bundle and set the quantity for each component.
Adjust components right in the document
Where? In a quote, invoice or delivery note draft, expand the line of a bundle. You will find the Components section there.
What can you do?
- Deselect / reselect: The checkbox takes a component out of the bundle or brings it back. The last component cannot be deselected.
- Swap: Swap replaces a component with another product, e.g. cucumber with tomato.
- Change quantity: Use the pencil on a component to set its quantity for exactly this line, for example 80, 50 and 20 instead of three equal shares. The bundle's master data in the inventory stays unchanged, and the quantity also stays in place when the event's guest count changes.
- Add a component: Add component adds any product from your catalogue with its own quantity, including one that is not part of the bundle.
- Undo: After deselecting and after swapping, a notice with Undo appears (not after reselecting). Univents only asks for confirmation if the component has already been packed or cooked.
What happens? The change applies to the booking and therefore to the Function Sheet, production list, materials and the kitchen lists. For orders to suppliers only drafts are updated; orders already sent stay unchanged. For packing and production lists only lists that are not yet released are updated; released ones show a notice that the source has changed. Deselected components no longer appear there, not even via the bundle list from the inventory. The bundle price stays the same. After a swap the quantity stays the same and the unit follows the new product – check the quantity briefly. The collapsed line briefly shows the difference, e.g. “Without cucumber”, “+ tomato” or “Cucumber → tomato”.
Good to know:
- Documents that were already sent stay unchanged.
- The document’s purchase price keeps calculating with the bundle composition from the inventory.
- If you copy an event, swapped components appear in the copy as “booked additionally”. A bundle whose components were all removed comes back with all its components in the copy – check the copy briefly.
- If you swap the product of the bundle line or apply a line template, the composition from the inventory applies again – your quantities and added components are dropped.
- The AI chat can also read components, deselect or reselect them, change quantities and add components, always with your confirmation.
Service details (only for type "Service")
For products of type Service, the sidebar shows its own Service section:
- Booking Duration — Minimum duration (hours) and Maximum duration (hours)
Billing model, availability, and time slots are still maintained in their own sections. For service products, the following price section is called Pricing & Billing instead of Price & stock, since services don't carry stock.
Price & stock
Click Price & stock in the sidebar.
Under Unit, content & package you define what every quantity and price of the product refers to. Everything is always saved in these three levels, never in a converted form:
- Unit — what "1" of this product is, e.g.
g,ml,bottleorpiece(blank = piece). Purchase price, stock, recipe quantities (when no content is set), material view, packing list, reorder and the unit on quotes and invoices all refer to it. If the product carries English, Unit (EN) appears below it for English documents. - Content per
<unit>(new, e.g. "Content per bottle") — how much a single unit holds, e.g.1000with base unitmlfor a 1-litre bottle. Both fields belong together: fill in only one and the form blocks with "Content needs both quantity and base unit". The base unit is free text — Univents suggestsml,cl,dl,l,g,kgandpiece, but you can type any other word. If Univents recognises a metric unit (also “litre” or “gram”), a note below says e.g. “Recognised as Litre — recipes can be entered in ml, cl, dl, or l.” Your text itself is saved unchanged. Leave both fields empty and recipes keep counting in the unit, exactly as before. A note under the field confirms it, e.g. "1 bottle = 1,000 ml". - Package — the packaging you buy in, e.g.
crate(not for bundles and services). - … per package — how many units one package holds, e.g.
12for a crate of bottles. Below it you see "1 crate = 12 bottle" as a check.
The package is used for two things only: the purchase price per package (see below) and rounding up to whole packages on packing, production and order lists. It is never used to label a quantity — 8 g of lime show as "8 g" in the recipe, not as "0.0016 crate", and even the Function Sheet always prints "5 bottle" for five bottles out of a crate of 12, never "12 × 5 × crate".
What the content is for. A drink is often sold and stocked by the bottle, but a recipe needs millilitres. With the content you no longer have to choose: sales, stock and purchase price stay in the unit (bottle), recipes are entered in the base unit (ml) — Univents converts between the two. Change the content on the product later (e.g. from 1,000 to 750 ml) and every recipe using that ingredient recalculates automatically, including the derived recipe cost price. Remove the content again (both fields empty) and recipes go back to counting in the unit. With a purchase price on file, the form also shows the price per base unit, e.g. "= €0.000645 / ml" for €7.74 for a crate of 12 bottles of 1,000 ml each — handy for comparing purchase prices across suppliers or package sizes.
Which units are converted. When you enter a recipe amount, Univents converts within mass (mg, g, kg) and volume (ml, cl, dl, l) — 8 g of lime with unit kg are saved as 0.008 kg and shown as “8 g”:
| Family | Units | Conversion |
|---|---|---|
| Mass | mg, g, kg | 1 kg = 1,000 g, 1 g = 1,000 mg |
| Volume | ml, cl, dl, l | 1 l = 10 dl = 100 cl = 1,000 ml |
Univents deliberately does not convert between volume and mass (ml↔g), because that depends on density; nor between pieces, bunches, bottles or spoon measures. The material view, packing list, reorder and documents always show quantities in the unit, never converted.
More on how the content affects recipes, the Kitchen Monitor, the production list and the Function Sheet is in Creating & using recipes.
Under Price enter:
- Price (net) — selling price excluding VAT
- Price (gross) — selling price including VAT
- Tax — tax rate as a percentage, e.g. 19 for standard VAT or 7 for food items
- Purchase price (net) — what the product costs you; the basis for contribution margin and cost of goods
The two price fields are linked: type into one and the other follows. The product remembers which side you led with — details under Enter prices gross or net.
Mind the basis on the purchase price. Next to the field you see what the amount refers to, e.g. "€ / g". If you have set a package — 24 bottles per crate, say — you can choose whether the amount you typed applies per unit or to the whole package. For a package price Univents works out the price per unit to up to six decimal places and shows it as the Unit price (€23.05 per crate of 5,000 g = €0.00461 / g), so prices per gram or millilitre never collapse to €0.00. If the basis says "per unit" but you type the crate price, the cost-of-goods report calculates with 24 times your real cost. Univents flags this as soon as the purchase price exceeds the selling price.
A Cost field now appears only on staff products, where it is the employee's hourly wage, deliberately separate from the price the customer pays. On every other product it meant the same as the purchase price — the two fields have been merged, and your stored value now sits on the purchase price.
Under Stock enter the current stock level. Enable Unlimited stock if you do not want to track inventory.
The Hide when sold out checkbox does two things: it hides the product on booking pages once stock runs out — and it rejects an order that is submitted anyway. This also holds when two guests order at the same time, or when someone has had the product sitting in their basket for a while: only as much gets through as stock covers, and the guest is told which product is affected.
Four things to keep in mind:
- For most products, stock is a total, not a per-day quantity. Whatever has been ordered is also missing for every later date. If you want to cap a quantity per day, use a time window with a capacity instead of stock.
- Anything that has not been rejected counts as taken. An inquiry that is still open counts too. Reject an inquiry and its quantity is free again straight away.
- Rental items are checked for their rental period, not against a total. A rental item comes back after its rental period and should be bookable again, so Univents checks whether the requested period overlaps with other bookings of the same item: stock minus the quantity of every position with an overlapping period. If two rentals don't overlap, the item is available for both. If a position has no rental period of its own, the event's period applies. The Buffer days (rental) from the Availability section additionally extend the occupied period before and after it — time for transport and prep, before the item can be booked again. If no buffer days are set, the buffer stays at 0 and the check works with exactly the booked period. If the rental item has no stock figure entered (or Unlimited stock is on), nothing is checked — the item stays bookable at all times. Internally, in the dialog for adding a position to an event, a tight quantity only shows as a warning; you can deliberately save anyway. The check uses the real time in your workspace time zone and recognizes events past midnight; a request without a time reserves the whole day.
- Without the checkbox nothing changes. Products with Unlimited stock, services, and products without a stock figure stay orderable at all times.
Availability
The Availability section defines when a product can be booked:
- Buffer days (rental) — mainly relevant for rental products: reserves extra days before and after the booking for cleaning or logistics time before the item can be booked again
- Min. guests / Max. guests — guest limits for automatic filtering
- Available weekdays — click the days; leaving them empty means all days are available
- Time window (from/to time) and season (from/to date) — restrict bookability to certain times of day or seasons of the year
Minimum and maximum quantity. In the Availability section you set, per product, how many units customers can order in the booking shop at least and at most — for every product type. With Min quantity the first "+" jumps straight to that amount, fewer cannot be ordered, and the limit is checked again on submit. Example: "canapés from 5 pieces per variety" — enter a minimum of 5 on each variety. There is no minimum across several products combined; that is what the booking page's minimum order value is for, which works in euros. Your customer can also type the quantity directly on the inquiry page, in the stepper and in the webshop: Univents raises a smaller number to the minimum quantity, caps a larger one at the maximum quantity, and 0 removes the product.
Availability is strictly enforced on booking pages. On quotes and invoices it appears as a note only.
Pricing conditions
Under Pricing conditions you can add dynamic pricing rules — for example, public holiday surcharges or volume discounts. Click Add pricing rule and select the Rule type:
- Time of day, guest count, quantity, distance, weekday, season, duration, public holidays, or location
For each rule you set a Surcharge type (percentage or fixed in EUR) and the Value. All fixed amounts are summed first, then the percentage surcharge is applied to the subtotal. A negative value is a discount — enter -20, for example, to reduce the price by 20%.
Example: staggering travel costs by distance. Open the travel product (billing Per kilometer), add a rule of type Distance under Pricing conditions, enter 40 in Min. km and leave Max. km empty. From 40 km onwards the adjusted kilometer price applies. Use several rules for several tiers, e.g. one for 40 to 80 km and one from 80 km. Important: the adjusted price applies to the entire distance, not only to the kilometers above the threshold. This requires a Distance (km) value on the event — it is calculated automatically from your company address when the event is created and can be overridden at any time.
Example: commission or discount depending on the venue. Pick Venue as the rule type and tick the venues the rule should apply to in the selection field. For external venues that charge a percentage commission, enter +12, for example; for your own houses, use a negative value as a discount. Three things matter:
- The rule is checked against the event's main venue — the one listed first on the event. Additional venues of the same event do not count. A rule created for a second room has no effect.
- If an event has no venue at all, or a document belongs to no event, the rule does not apply. Nothing is guessed.
- Percentages are the safe choice. A fixed discount that applies to a category or to the whole workspace is skipped on very cheap items (see “Why does a line item suddenly cost €0.00?” in the article on finance document settings). A percentage does not behave that way.
On booking pages: if the booking page has a venue selection step, the rule takes effect as soon as the customer picks a venue — on the product card price, in the cart, at checkout and in the submitted order alike. That includes webshop pages that offer the venues as selectable tiles. Ticket pages have no venue selection: there the page calculates without a venue, and the rule only applies once you set a venue on the event in the back office and the document is recalculated.
Venue groups are deliberately not offered for selection: an event is always attached to a concrete venue, never to its group — a rule on the group would never match. Select the group's venues individually.
Example: holiday surcharge. Pick Holidays as the rule type and enter the surcharge, e.g. +20 percent. Below that you choose:
- All holidays of the region (the default) — the rule applies on every public holiday. You don't have to create a rule per holiday.
- Only specific holidays — a selection appears where you tick individual holidays, e.g. only Christmas Eve and New Year's Eve.
Which holidays count depends on the holiday region. You find it at the top of Pricing conditions on the product. Without a value it says Same as workspace — then the holidays from Settings → Holidays apply. If you choose a different country or region (e.g. Hamburg although your business is based in Bavaria), every holiday rule of this product uses the holidays of that region — on the booking page, in quotes and in invoices. The Only specific holidays selection then lists that region's holidays too. A sentence below the rule always tells you which region currently applies. The new region takes effect once you save the product.
Venues have no holiday region of their own: they are priced through their mandatory products, and for those the product's region counts. Rules of a category or of the whole workspace use, per position, the region of that position's product.
Payroll products: here holiday surcharges follow the person's holiday region first (staff file). The region on the payroll product applies to everyone without one of their own, and only then the workspace region.
Rules assigned to the product's category appear in the Rules inherited from category block as read-only. You create and change them under Inventory > Categories > Edit > Pricing rules — they then apply to every product in that category.
The Priority field only controls the order in which rules appear in the price breakdown — a lower number comes first. It does not decide which rule wins: if several rules match the same line item, all of them are added up. With just one rule the value does not matter.
A rule only takes effect if its condition is filled in. A rule of type Time of day without a from and to time, or one of type Quantity without a quantity range, is never applied — the list marks it as No effect. Add the missing condition via Edit, or delete the rule.
Booking
Under Booking you will find two sub-sections:
Custom questions — link questions to this product. They appear on the booking page as soon as a customer selects the product (e.g. "Should the cocktails be non-alcoholic?"). You can create new questions directly here or add them from the central question pool in the Questions tab.
Bookable time slots — enable time slots if the product should be booked at specific times (e.g. a photo booth from 2:00 pm–4:00 pm, independent of the event duration). Select a mode (manual times or fixed intervals) and a Capacity per slot. For time slots that sell a room (product linked to a venue), only accepted requests count against the capacity; for ordinary time slots such as a cooking class or a tour, every open request counts. Deleted, archived and “date flexible” requests never count.
Back office
The Back office section groups settings that customers never see. It is divided into three areas:
Accounting — enter the Contra account and Cost centre. Clicking Show advanced fields reveals the additional Credit account and Revenue account fields — useful for DATEV exports.
Automation — under Staff schedule templates select a template so that shifts are created automatically when a booking is confirmed. Enable Send order email automatically to trigger an internal notification whenever a new booking comes in. Use Who should be notified about a new booking? to add users or contacts. Under Supplier you assign the supplier of this article, and below it under Supplier item no. the number that supplier uses for it in their own catalogue. That number is printed on the supplier order — in the preview, in the PDF and in the order email — so the supplier recognises the line straight away. Without it, your own item number is shown as before.
Miscellaneous — assign Tags for filtering and enter Internal notes that appear on production lists and function sheets.
Changing several products at once (bulk edit)
In the Catalog tab, tick the products you want to change. As soon as at least one is selected, the selection bar appears at the bottom; open Edit multiple products from there. Under Feld, pick what should be set — Set VAT, Set category, Set supplier, Set storage location, Add tags or Set switch — enter the new value and confirm with Apply to N products. Only the ticked products change.
The same selection bar also has a Delete button. It first shows you how many products are affected and what they are called; they are gone only once you confirm. Existing quotes and invoices keep their line items. Only roles that may delete in the inventory see the button.
Set switch
Set switch flips one switch for all selected products. Pick the Switch and the New state — On or Off; the dialog shows you in plain language beforehand which switch will be set to which state on how many products. The choices are:
- Use as payroll product
- Use for kitchen production
- Unlimited stock
- Hide when out of stock
- Hide when unavailable (date/context)
- Bill by consumption
- Show components on the booking page (with image)
- Automatically create shifts when the event belonging to this product is accepted as an order
- Use event duration as shift duration
- Automatically send order email
On means the switch is on for all selected products afterwards — including those where it was off before; Off is the opposite. The previous state doesn't matter: this sets, it doesn't toggle. Give your selection a quick look before confirming.
The AI chat can run the same action — it tells you how many products are affected and waits for your confirmation.
Viewing a product image full size
A click on the small product image in the product list opens it at full size — handy when a label or the text in the thumbnail is too small to read. For AI-generated images the label stays visible in the large view as well. To close it: click next to the image, press Esc, or use the close icon.
Tips
- Draft vs. published: A newly created product starts as a draft. It only becomes visible on booking pages after you click Publish. Saved changes to products that are already active take effect immediately.
- Rename a position instead of creating a product: You can overwrite a position's name straight in the quote, invoice or delivery note — turning "ciabatta with ham" into "ciabatta with salami" because that article does not exist yet. That name then counts everywhere: on the document, on the kitchen sheet, in the supplier order, in material planning and in the Bookings tab. Your product catalogue stays untouched. Clear the name on the position again and the product name takes over automatically. The same applies when you swap the article on a position: the new article's name travels to every sheet.
- Swapping a product also swaps the description: If you pick a different product on a position, the line adopts that product's description — even if the new product has none. The old description then no longer appears under the new name (no beef with the predecessor's sauce). If you pick the same product again or change only the quantity, price or note, your text on the line stays. A description you typed yourself belongs to the old product and deliberately does not survive the swap — write it again afterwards if you still need it.
- Descriptions come from the position: The description under a position's name — a dish's ingredients or sides — is printed on the function sheet and the production list exactly as it appears on the document. Adjust it on a position and the adjusted version counts. Only when the position has no text of its own does the product catalogue's description step in.
- Use the internal name for sorting: Prefixes such as
00,01,02at the start of the internal name control the order in lists, in the line-item picker of quotes and invoices, and in the product selection on your booking page. Your customer only ever sees the regular name. Products without an internal name are sorted under their regular name. - View categories alphabetically: In the Categories tab, the Sorting switch at the top right toggles between Manual order and A–Z. Neither view changes the saved order — that order still drives the group order on the function sheet and the order of products within a category. The dropdowns are independent of this: categories in the product form, in bulk editing, in the inventory filter and on a document are alphabetical, no matter how you sort here. Switch back to Manual order to rearrange by dragging.
- Production categories stay out of product pickers: The categories from the Production categories tab (kitchen, storage, logistics …) only structure the kitchen monitor. They never show up in the product picker of quotes and invoices, in filters, or on booking pages — nor in the Category field of the product form, which lists your sales categories only. You maintain production categories in the product's production tab.
- Category order beats the name: On the booking page your category order decides first (Inventory → Categories, field Order), the internal name second. To push travel or equipment to the bottom, give those categories a higher number.
- Switch the catalog sorting: The catalog shows the newest products first. The selector in the filter row switches to internal name, product name or price.
- Net and gross at a glance: The Price column of the catalog shows the net price with the gross price right underneath. Sorting uses the net price. For products without VAT, both values are the same.
- Calculate bundle price automatically: Enable Calculate the bundle price from the bundle products in the Price & stock section so that the selling price is summed from the individual components.
- Multilingual products: Use the Languages toggle in the Basic data section to maintain names and descriptions in English (or other languages) — useful for international clients.
- Create categories directly in the product: If a suitable category is missing, click the plus icon in the category field. The category dialog opens without you having to leave the product editor.