

Financial Documents: Quotes, Invoices & Delivery Notes
Create, edit, send, and manage the status of quotes, invoices, and delivery notes directly within an event — including the warning when the email template is switched off.
Financial documents let you create quotes, invoices, delivery notes, and credit notes directly from within an event and send them by email. All documents share the same editor; type-specific fields and status actions adjust automatically based on the document type.
Exception for delivery notes: A delivery note is not sent by email. You print it as a PDF or have it signed on site, then mark it as signed. That is why the "Save and send" button does not appear on delivery notes at all. In its place you get the Delivery driver field: pick the team member who drives the tour. It stays editable after the document is finalised or signed — if someone drops out, you simply enter somebody else.
The video shows how a quote goes out, what the check before sending reports, and how you follow up afterwards.
You’ll find the individual steps written out below as well.
Where are documents found?
Financial documents are grouped under the Documents tab inside an event. Quotes, invoices, delivery notes, and credit notes all appear together in a card view. A workspace-wide overview of all open documents is available in the main menu under Financial Documents.
Below the document number and date, each card names the document's recipient — plus their company for a contact person. If it says "No recipient selected", the customer is still missing and the document cannot be sent.
The recipient belongs to the document, not to the event
This is the key point about the billing address: every document stores its own recipient. The event's customer only pre-fills newly created documents. That means:
- When you copy an event, the copied documents keep the template's recipient — even if the copy is meant for a different customer. (While copying you can switch the Billing recipient toggle off; the copy's documents then have no recipient.)
- When you change the event's customer later, documents that already exist do not follow automatically — otherwise changing a customer would silently rewrite the address on documents you had already agreed on. Univents asks you about it instead, see the next section.
Changed the event's customer: bring the documents along
When you assign a different customer while editing an event, the Apply changes? prompt appears after saving, now with a Customer changed section. It lists every draft still addressed to the previous customer — with document type, document number and current recipient. Tick the ones that should move to the new customer, either individually or via select all.
Three things worth knowing:
- Nothing happens on its own. All boxes start empty. Confirm the prompt quickly and every document keeps its recipient.
- Only drafts are offered. Documents you have sent, finalised or issued are legally frozen and never appear in the list — changing their recipient means cancelling them and creating a new document. Drafts that already go to the new customer are left out too.
- The default discount comes along. If the new customer has a default discount stored and the document does not yet carry a header discount of its own, it is applied — exactly as when you switch the recipient inside the document.
If the event has no customer at all there is no recipient to switch to, so the section stays hidden.
So if a document shows the wrong billing address, you change it on the document itself: open the document, expand the Client field in the header and pick the right contact. For each person the dropdown shows their company and their email address — helpful when two contacts share a name but belong to different companies. Note that editing the contact itself (a new email address, for example) does not change the printed address: for a contact person linked to a company, the address comes from that company.
Choose a different recipient, or edit the contact?
The Bill to card in the document editor has two buttons that are easy to mix up — but they do completely different things:
- Choose a different recipient opens the customer picker at the top of the document. You pick another contact there and change only this one document — the event keeps its customer and other documents stay as they are.
- Edit contact changes the master record of the contact: name, address, email address and everything else that hangs off it. That change applies everywhere, also as the customer of the event and on every other document — the edit window says so up front. If only this one document should go to someone else, Choose a different recipient is the right way.
To create a new document inside an event:
- Open the event and switch to the Documents tab.
- Click the New dropdown button.
- Select the desired type: New Quote, New Invoice, New Delivery Note, or New Credit Note.
- The editor opens immediately.
Filling in the header
The header section is identical for all document types. Fields are saved automatically when you leave them.
| Field | Description |
|---|---|
| Document Name | Internal title, e.g. "Quote – Müller Wedding" |
| Client | The recipient of this document — a contact from your contact list. If they are a contact person at a company, Univents prints the company above them and uses its address when the person has none of their own. If the contact carries an academic title (“Dr.”, “Ing.”), it appears on the document's recipient card too — exactly as it does on the PDF |
| Date | Date of issue. A draft starts with today's date; leave it untouched until you issue the document and the day of issuing applies instead, with the payment term counting from there. A date you entered deliberately stays as it is |
| Clerk | Team member responsible for the document |
| Service Period Start / Service Period End | Period of service rendered, shown on the PDF. On a new document it is prefilled from the event; a deposit or partial invoice takes it from the quote or invoice it is created from. You can overwrite it at any time. On a quote it is optional: if the date isn't fixed yet, leave it empty — the quote can still be sent, and the PDF leaves the line out. Invoices, delivery notes and credit notes need it to be sent |
| Valid for (days) (quote) / Payment term (days) (invoice) | One field, two meanings — the label follows the document type. On a quote: the quote stays valid for this many days after the quote date. On an invoice: the invoice falls due this many days after the invoice date — Univents prints that date as Payable by on the invoice and carries it into the e-invoice. It is pre-filled from Settings → Finance Documents → Default validity and Default payment term |
| Send Reminders (quotes only) | Days after the document was sent, on which a follow-up is sent automatically. Invoices no longer have this field — you chase overdue invoices under Payment reminders |
| Send reminder to (quotes only) | Who is reminded on those days: Customer (default) gets the follow-up email, Internal only does not email the customer and creates a follow-up task for your team instead, Customer + internal does both |
The name comes pre-filled. When you create a new quote, invoice, delivery note or order confirmation, Univents automatically fills in the document name as the document type plus the name of the event — for example “Quote Summer party”. As soon as you overwrite the name yourself, your entry stays; documents that already exist do not change. The document type therefore appears only once: the PDF header no longer repeats it above the name.
For invoices, an additional Invoice Fields section appears with Cash Discount Days, Cash Discount Percent, Reverse Charge, and Due Date. For delivery notes, a Delivery section appears with the Delivery Date field.
Delivery notes also have their own Additional Items Provided section below the regular line items — for things delivered but not charged (e.g. loaned dishware). You add items there via the section's own Add Item or Add from Template buttons; they don't count toward the invoice total but still appear as their own list on the PDF.
Editing line items
Below the header you will find the line-item editor. Each item contains:
- Title (required)
- Description (optional, collapsible) — below it, Description in PDF decides whether it's printed (see below)
- Internal note (optional) — for your team only; it never appears on the PDF or in the customer portal
- Category (required)
- Unit 1, 2, 3 for multi-level quantity entries
- Cost net (€) for contribution margin calculation
- Price net (€), Discount (%), VAT (%)
Positions open collapsed by default. If you work in quotes a lot, turn on Open all positions expanded in quotes and documents by default under Settings > Language & region — every position then shows its customer description and internal note right away (applies to you only).
Unit 1 is the unit of your quantity — piece, portion, hour. Unit 2 and Unit 3, by contrast, are a factor applied to the quantity, not a second quantity: this is where guests, hours or kilometres go, multiplying quantity 1. That is how you tell two items of 3 × 50 guests apart from one with 150 pieces. A hint above the two column headers explains this; leave both empty and only quantity 1 counts.
When you search for an item by its title, the result list shows the full item name: long names wrap onto two lines instead of being cut off, and if an item has a different internal name, the shop name appears underneath it as well.
The cost price is always a net price. The sales price follows the document's price basis (see Enter prices gross or net); VAT is set per line via the VAT (%) column.
The last column carries its side in the heading and shows exactly that:
- Total net (€) on a document that calculates in net — the line amount excluding VAT, i.e. unit price times quantity minus discount. This is the default.
- Total gross (€) on a document that calculates in gross — the line amount including VAT.
That way unit price and line total match within the same row: a net document shows “Price net” on the left and “Total net” on the right, so you can check the line in your head. The subtotal above each section still states net and gross separately, and the totals panel at the end of the editor still shows both sides.
The internal note belongs to the position, not to a single document: write it in one document and it automatically shows up on the same position in the event's other open documents and in the bookings overview. Documents that are already issued or sent are left untouched.
If your role may only view finance documents, every input in the line-item editor is locked and a notice above the items states that you only have read access — previously Add position created an empty row and only failed afterwards with an error message. Deleting an item from the Bookings tab is refused as well, so nothing is removed halfway (see below). You can write once your role carries Edit on the Finance module (see Members, roles & permissions).
Clicking Add from Template opens the Select Template dialog. There you can search saved line-item templates and add them with a single click on Add. Use Manage Templates to edit existing templates, or Create Template to create new ones.
If the document is still empty, a hint above the line items says so and asks whether you want to adopt items from another document of this event. One button per source document adopts all of its items at once; Choose other items takes you to the Adopt Items section below instead. The hint disappears as soon as the document has items — nothing is filled in by itself.
Below the line items you'll find the collapsible Adopt Items section. It groups everything you can pull into this document: Bookings without a document and Shifts without a document — open bookings or planned shifts on the event that aren't on any document yet — plus From other documents: one expandable section per other document on the same event (e.g. an existing delivery note or quote), each showing that document's net total. Use Add to adopt a single line, or Add all to adopt every item in a group or document at once. If your document already has sections, you can also pick a target section at the top of the area — it applies to both Add and Add all; without a selection, items land under "No section". Adopted items keep their title, quantity, price, and discount exactly as in the source, and disappear from every other section afterwards so nothing gets added twice.
A shift is no longer offered under Shifts without a document once it sits on a document of the event itself — or when its service is already there from a booking or as a manually typed line. In the latter case it now appears in the Shifts already billed through a booking group, marked Billed via booking: adopting it a second time is not possible, the service would then be on the document twice. If you change the shift's times or head count afterwards, the position does not follow by itself — that line comes from the booking. When the two differ, the group says so and Adopt quantities sets the position to the shift's current state: count and hours move, price, discount and text stay untouched, and the document total changes accordingly. Before anything is written you see every affected position with its before and after. When several shifts are billed through one position the button is deliberately absent — which share belongs to which shift is yours to enter on the position itself. Several shifts sharing the same item — two service-staff shifts at different times, say, or two grill stations — are several sold services: each one stays selectable and all of them can be adopted.
If a booking on offer already sits in the document as a line item — same product, same quantity, same price — it is flagged already in document. Those bookings are skipped by Add all (you get a message afterwards saying how many), and adding one individually asks for confirmation first. That way an item can't end up in the document twice by accident. If you really do want to charge it twice, confirm with Add anyway.
Till: If your till is connected, the section in a draft invoice additionally shows a Till section. It lists the event’s till bookings that are not on any invoice yet, per product group and tax rate. The section only exists in the final invoice, not in quotes, delivery notes, credit notes or down payment invoices. More in the article “Till reconciliation”.
Totals and PDF settings
At the bottom of the editor the totals panel shows:
- Subtotal (Net), Discount, VAT, Total
- Cost (Net) and Contribution Margin (Net) as internal figures
Above them sit two controls that change the total: Discount (%) takes a percentage off the whole document, Add surcharge puts a percentage on top. The surcharge appears as its own position at the end of the document; with mixed VAT rates one line per rate is created carrying its matching share. A negative discount is deliberately not possible — for an add-on, the surcharge is the correct route. Details in the article “Surcharge on the document total”.
Contribution Margin (Net) now shows the ratio in percent next to the amount, for example 1,234.00 € (32.1%). It tells you what share of your net revenue is left after the recorded cost prices — 1,234 € on 3,000 € of revenue is a different message from the same 1,234 € on 60,000 €. If the contribution margin is negative, the minus sign precedes both the amount and the percentage. If the document has no net revenue yet, Univents shows the amount only and no ratio: a percentage without a reference value would be guesswork.
If the stored total differs from the sum of the line items, a note below shows both amounts. This can happen on older, already-issued documents whose line items were changed afterwards: the stored total is no longer recalculated once a document is issued, whereas the PDF always recalculates from the line items. The amount on the PDF is the authoritative one — it's what your customer received.
The Internal Notes field lets you record notes for your team. These do not appear on the PDF.
Under PDF Settings you control the behaviour of the generated PDF:
- "Total" column shows net instead of gross prices — otherwise the PDF prints the gross amount per line in the Total column. To change it permanently for new documents, go to Settings → Finance Documents → Finance document display
- Combine items and show total price only
- Show VAT column
- Allow page break within a table row
- Repeat table header on each new page
- Show product images
- Hide item descriptions — applies to all items of the document; you can exempt individual items (see below)
- Sort tables by delivery notes
- Sort positions by sections and your own order (instead of by category)
- Break each section subtotal down by VAT rate: the section then ends with Subtotal … (net), one line per VAT rate that occurs in it — plus VAT 7%, plus VAT 19% — and Subtotal … (gross). The switch turns section sorting on as well, because without sections the PDF prints no subtotals at all. Sections without any VAT keep their single line
If you click the same switches on every document, set them once as defaults: the link Set defaults for new documents next to PDF Settings takes you to Settings → Finance Documents → Finance document display, where every one of these switches has a default. Every new document starts with the defaults you switched on; existing documents stay as they are, and a template that sets a switch itself takes precedence. You can still change everything on the individual document afterwards.
Show or hide the description of individual items
The Hide item descriptions switch applies to the whole document. If you only want descriptions on some items — say on the menu, but not on tableware and staff — you control it per item: expand the item and, below the description field, choose under Description in PDF:
- As set for the document (default) — the item follows the Hide item descriptions switch. The brackets tell you what currently applies: shown or hidden.
- Always show — the description appears in the PDF even if the document otherwise hides descriptions.
- Hide — the description is left out of the PDF even if the document otherwise shows it.
The description text itself stays — you only decide whether it's printed. The setting carries over when you copy the document, turn a quote into an invoice, or save the document as a template. It is deliberately not passed on to linked documents of the same booking (for example from the quote to the delivery note): what a document prints is decided per document.
E-invoice (XRechnung)
For every issued invoice and credit note (including deposit/partial invoices), Univents automatically creates an e-invoice in the XRechnung format alongside the PDF — downloadable from the document and the customer portal, and optionally attached to emails automatically too. For details, including what the “E-invoice incomplete” note means, see E-invoice (XRechnung) for invoices and credit notes.
What's missing to send: send validation
Before you can send a document, Univents automatically checks whether all required fields are complete. If something is missing, the send area shows a "Still required to send:" notice with the specific list of open items. Each item is named exactly like the field it belongs to:
- Document name (the topmost field in the header area — not the Title of a position)
- Customer
- Issue date
- Service period (start) and Service period (end) — on invoices, delivery notes and credit notes. You can send a quote without a service period while the date is still open; the invoice for it will ask for it again
- Validity / payment term
- At least one position — with Description, Quantity, and Category on every position
- Company name, Company address, and Tax number or VAT ID (all three from your settings). For workspaces with country Germany, Austria, Switzerland, an EU country, the United Kingdom, or Norway, the tax number/VAT ID is required. For all other countries (e.g. the USA), it's shown as a hint only — sending is not blocked without it.
- Recipient name and Recipient address — for invoices up to €250 gross, the address is not required (small-amount invoice under § 33 UStDV); the name is always required
- If a customer imported from your previous software only has a single-line address (for example "Leopoldstraße 25, München"), the notice reads Complete recipient address (street, postal code and city as separate fields). That line does get printed on the PDF, but an invoice needs street, postal code and city separately. Click Edit contact in the notice — the old line is already split into the individual fields, so you only add what is missing and save
Only once this list is empty can the document be sent.
Sending a document and managing status
Once the document is ready, three buttons are available at the bottom:
- Cancel exits the editor.
- Save as Draft saves the document with the status "Draft" and exits the editor.
- Save and Send renders the PDF, sends it to the client by email, and changes the status to "Sent". If the PDF can't be generated, no email goes to the customer, the document stays unchanged, and you get a “Document not sent” alert in the bell with a link to the document.
On the Scale plan the owner can require that quotes and invoices are only sent or issued after an approval — this also applies to “Mark as sent”; without an approval the document stays a draft. Automatically created invoices — for example after a payment or for tickets — are exempt. See the article Approvals for quotes, invoices and inquiries for details.
Which address the document goes to
The confirmation before sending names the address the document goes to. If the contact has more than one address on file, that line becomes a Recipient field: you pick one, with the main address preselected.
So a client with several points of contact only needs one contact record. Add the extra addresses to the contact under Additional email addresses — then you decide at send time whether the quote goes to the office and the invoice to accounting.
Only that contact's own addresses are offered; there is deliberately no free-text field. If an address has been deleted on the contact in the meantime, Univents sends nothing and tells you — it will not quietly fall back to the main address either.
The same confirmation also tells you whether the PDF goes along as an attachment or whether your customer opens it via the link in the email — the text names the route to Settings → Finance Documents, where you change it.
If the template is off, the confirmation warns you beforehand. If the email template Quote sent is switched off under Settings › Email templates, an extra note appears in the confirmation: the document is only marked as sent, your customer receives no email. A link in the note takes you straight to the right template, and you can still send — a quote you posted yourself should keep being tracked as sent. Nothing has happened at that point: the note appears before you confirm.
And Univents does not leave you guessing afterwards either: after sending, the bell tells you that no email went out to the customer. That note deliberately arrives even when you have muted the notification category Finance Documents — a muted warning would be exactly the warning you need. Whether a template is active is set with the Active switch in your email templates.
After sending, the Status Actions section appears. Which actions are available depends on the document type and its current status:
| Document type | Status | Available actions |
|---|---|---|
| Quote | Draft | Mark as sent, Mark as accepted, Mark as rejected — none of them emails the customer; the quote immediately receives its final document number |
| Quote | Sent | Accept, Reject, Cancel |
| Quote | Accepted | Cancel |
| Invoice | Issued | Send, Mark paid, Correct invoice, Full credit note (storno) |
| Invoice | Sent | Mark paid, Mark overdue, Correct invoice, Full credit note (storno) |
| Invoice | Overdue | Mark paid, Correct invoice, Full credit note (storno) |
| Invoice | Paid | Correct invoice, Refund (only if paid via Stripe), Full credit note (storno) |
| Invoice | Cancelled | New cancellation credit note — only once the previous credit note has been cancelled |
| Delivery Note | Draft | Finalise |
| Delivery Note | Finalised | Mark signed, Undo finalisation |
| Credit Note | Draft | Issue credit note, Cancel |
| Credit Note | Issued | Send, Mark as settled, Cancel |
| Credit Note | Sent | Mark as settled, Cancel |
Destructive actions such as Cancel, Full credit note, or Correct invoice require confirmation.
You can only mark a delivery note as signed once it has been finalised — while it is still a draft, the Mark signed button does not appear at all. And as long as no PDF has been generated for a finalised delivery note, the toolbar shows a hint line telling you that there is no PDF for this delivery note yet.
Marking a quote you sent yourself as sent
If you download a quote as a PDF and email it yourself, it stays a draft in Univents. Validity, reminders and automations only apply to a sent quote, though. To have them run anyway, mark the quote as sent:
- In the quote, click Mark as sent under Status actions — or pick the entry in the menu of the quote card under Documents.
- Confirm the prompt.
No email goes to the customer. Univents generates the PDF and then sets the quote to “Sent” with today’s date, exactly as when sending through Univents, just without the email. From then on:
- The validity runs, and an expired quote is shown as expired as usual.
- Automations with the triggers “Quote sent” and “Quote expired” fire. If one of your rules sends an email to the customer on “Quote sent”, that email goes out here as well.
- Any reminders you set up start, as a task for your team and never as an email to the customer: when marking, Univents sets “Send reminder to” to “Internal only”.
- The history shows “Sent”, as for any send.
The button is only available for draft quotes, not for invoices and not for a quote that has been replaced by a newer version. The prompt shows you until when the quote is valid. If the validity has already expired, it can’t be marked: first adjust the date or validity in the quote. With Save & send, your customer also gets the quote with a link to accept it online.
Cancelling an invoice
An issued invoice cannot be deleted — cancelling always runs through a credit note, in three steps:
- On the invoice, click Full credit note (storno). Univents creates a credit note as a draft and opens it.
- In the credit note, click Issue credit note. The credit note gets its final number, and the original invoice counts as cancelled from that moment on. No email goes out yet.
- Optional: send the credit note as well so the customer receives the document.
While the credit note is still a draft, nothing happens to the invoice — it stays open. If an invoice already has a credit note, clicking Full credit note again opens that existing draft instead of creating a second one.
Replacing an incorrect credit note
If the credit note is wrong — a typo, or the wrong amount — replace it in three steps:
- Open the incorrect credit note and click Cancel there. It stays on file as a cancelled document; that is intentional and part of the document trail.
- Go back to the invoice. It sits at Cancelled and now offers New cancellation credit note — in the document toolbar and in the document card menu. Univents creates a new credit note as a draft, again with all positions and the invoice’s discount.
- Check the new credit note and issue it, then send it if you want the customer to have the document.
The customer gets the cancellation notice only once per invoice. If they already received the “Invoice cancelled” email for the first credit note, Univents won’t send it again when you send the replacement — the invoice was already cancelled. The document itself is still delivered as usual. Two different invoices of the same event stay independent: each gets its own cancellation notice.
The invoice’s cancellation is not undone in the process: the invoice stays cancelled throughout, only the credit note that documents it changes. While the old credit note is still issued, New cancellation credit note stays blocked — there can only ever be one valid credit note per invoice. Univents then tells you the number of the credit note you need to cancel first. A partial cancellation is no longer possible on a cancelled invoice: it has already been credited in full, so crediting part of it on top would be a double credit.
The full credit note already brings the positions along. Univents copies every position of the invoice into it with a negative amount, so the credit note matches the invoice from the start. That is why a credit note does not offer the Adopt positions from other documents section: a position adopted there would arrive positive and cancel out exactly that much of the storno. To refund only part of an invoice, use Partial cancellation… on the invoice and pick the positions. You can also delete individual rows or change their quantity directly in the credit note draft.
When you delete a row, Univents asks how far it should go. This document only takes the position out of the document you currently have open — everywhere else it stays. Remove everywhere additionally strikes it from the event's booking overview and from the event's other drafts, changing their content and their total. The dialog shows you beforehand which documents are affected and how many positions disappear there, and after the deletion a message tells you what actually went with it. Documents that have already been issued are never touched — their positions stay frozen. If the position is not linked to any other live row, Remove everywhere is preselected and This document only sits next to it as the secondary option — otherwise a booking would remain without a position and keep appearing on the function sheet, production list and packing list.
The same applies in reverse: if you delete a position in the event's Bookings tab, it also disappears from every open document. The bookings are the truth — a position that is no longer booked must not live on in any quote or invoice draft. The confirmation dialog in the Bookings tab tells you beforehand which open documents lose how many positions; documents that have already been sent or finalised stay unchanged here too. This requires permission to edit financial documents: if the position is part of an open document and your role may only view documents, Univents rejects the deletion as a whole — the booking stays in place, nothing is half removed. If you only want to take a position out of a document without removing it from the event, delete it in the document with This document only.
Correcting an invoice
Instead of just cancelling a faulty invoice, Correct invoice replaces it with a revised version in one step: Univents cancels the invoice in the background (a silent credit note, with no email to the customer) and immediately creates an editable draft with the same line items. When that draft is sent, it gets a new invoice number and today's issue date.
Refunding an invoice (Stripe)
If an invoice was paid via Stripe, the Refund action additionally appears once the invoice is Paid. In the dialog you choose between Full refund and Partial refund; for a partial refund you enter the Amount (€) and can record an internal Reason. The refund is returned to the original payment method — the invoice itself stays marked as paid.
Marking a credit note as settled
For a sent credit note, use Mark as settled to record that the amount has been settled with the customer, e.g. offset against a new invoice.
Stale-chain warning: follow-up documents from an older quote version
If an accepted quote is edited again afterwards, invoices or delivery notes already created from it may be based on an outdated quote version. In that case Univents shows a warning that the follow-up documents were not automatically updated, along with a Recreate from this version button — the old draft documents are then marked as replaced.
Filtering and sorting the document list
Under Finance documents you pick the document type at the top. The status filters below follow that choice: invoices offer Draft, Issued, Sent, Paid, Overdue and Cancelled, quotes additionally "Change requested", delivery notes Draft, Finalised and Signed. Only states that actually exist for that document type are offered.
On every document-type tab the list is sorted by document number, highest first. Clicking the Number column reverses the order, clicking Service date sorts by that instead. The arrow always shows what the list is currently sorted by. Drafts have no number yet and therefore come last.
A number seems to be missing? It usually sits on a credit note, which lives in its own tab. That is why the row of a cancelled invoice shows which credit note it belongs to, and the credit note shows which invoice it settles.
The "Expired" and "Obsolete" statuses
- Expired — Univents automatically sets a sent quote to "Expired" once its configured validity (days) has passed.
- Obsolete — a document carries this status once it has been replaced by a newer version, for example when follow-up documents were recreated from a more recent quote version via the stale-chain warning.
Issuing an invoice without sending it right away
Invoices and credit notes that are still in draft have an extra action alongside the buttons above: Issue Invoice. It separates the final numbering from the email send — you lock the document in legally without having to send it to the client at that moment.
- Open the draft invoice and click Issue Invoice.
- In the Assign invoice number for good? dialog you'll see the exact next number. Confirm with Issue.
- Univents assigns the number, locks the document under §14 UStG, and renders the PDF right away. The status changes to Issued.
An issued invoice can no longer be edited or deleted — only corrected via a credit note. Sending it by email is a separate decision: the usual send option stays available anytime from the Documents tab.
Default discount for repeat customers
If you enter a value under Default discount (%) on a contact (contact form, next to the debtor number), that discount is automatically pre-filled as the document-level discount on every new document you create for that customer — whether you create the document manually, it comes from an accepted inquiry, or it's created automatically from a booking-page order. If a document already has its own document discount, it's left untouched; the customer default only applies while it's still at 0%. Changing the recipient in the document editor applies the new customer's default discount under the same condition.
Invoice email, payment terms and primary contact
Three details on the customer contact steer this document. You maintain them in the contact form — what each of them means in detail is described in the article "Managing Contacts & Companies".
- Invoice email: if the customer has a separate invoicing address (their accounts department, say), it is preselected in the recipient field when sending an invoice or credit note. Payment reminders, auto-invoices and automatically sent documents use it too. Only this contact's addresses are offered — an address typed in by hand is rejected.
- Primary contact: if a company has a primary contact, that person's address is preselected when sending to the company, and they appear in the PDF's salutation. The company name, email address and VAT ID on the document stay the company's. If the recipient is a company whose only linked sub-contact is another company, Univents prints neither a person line nor a personal salutation for it — the document addresses the company itself, not the linked company.
- Payment terms: when an invoice is created, Payment terms (days) is pre-filled from the customer's payment terms and overrides the workspace default (
Settings → Finance Documents → Default payment terms). Without payment terms on the customer the default applies; a value already set on the document is not overwritten. Quotes, delivery notes and credit notes keep their own validity or payment terms.
Deducting an advance payment from the final invoice
Deposit and partial invoices (for example the automatic deposit when a quote is accepted) are deducted automatically: as soon as the deposit is issued, it appears in the draft of the final invoice as a negative position “./. Anzahlung <number> vom <date>” when you open it — with one line per tax rate when rates are mixed. If the deposit is cancelled later, the deduction disappears from the draft again. Adopting a deposit invoice via Adopt positions creates the same deduction, not a copy. A deposit that is still a draft is not deducted — issue it first.
If the customer paid the advance through a regular invoice, you deduct that amount in the draft of the final invoice. Above the positions list you will find the Advance payment card with the Deduct advance payment button: it opens the list of paid invoices for this event (for a document without an event: the ones for this customer) with number, amount and date. Clicking Deduct inserts the advance as a negative position — titled "./. Anzahlung <number> vom <date>", and with a separate line per tax rate when rates are mixed, so VAT and the final amount add up.
Worth knowing:
- Drafts only. Once the invoice is issued its positions are locked (GoBD) — the card no longer appears there.
- Once per invoice. An invoice that has already been deducted is marked Already deducted in the list. Once every paid invoice is settled, the card tells you so.
- Nothing there? Then there is no paid invoice for this event. The deduction only becomes available once the deposit invoice is marked Paid.
- Do not deduct regular invoices via “Adopt positions”. For a regular invoice, adopting copies the line exactly as it stands — it would be added. Use this card instead.
- Sending requires all deposits to be paid. An issued but unpaid deposit already shows as a deduction in the draft; the final invoice can only be sent once it is marked Paid or cancelled.
- If the advances exceed the final invoice, it cannot be sent. Issue a credit note for the difference instead.
Making an invoice payable online
If a payment provider (Stripe) is connected, a customer can pay a sent invoice directly by card in the customer portal. In the document editor, you control this per invoice with the Allow online payment toggle. How new invoices start is set once under Integrations → Payments with New invoices offer online payment (default: on). Without a connected payment provider neither toggle is shown and every invoice stays off — there would be nothing to allow. Use Copy payment link to copy the matching portal URL directly to your clipboard, for example to share it by phone or chat. If the invoice isn't (yet) payable — for instance because it hasn't been sent, is already paid, or the outstanding amount is under €10 — the button is greyed out and shows the reason in a tooltip.
Chasing overdue invoices
When an invoice is overdue, you chase it under Payment reminders (Finance documents → Payment reminders): three stages — Payment reminder, First reminder, Final reminder — each with its own PDF, fee and payment deadline, optionally with default interest and a €40 flat fee. Univents shows what is due and you send one by one or for selected invoices with a click. On the invoice, the Payment reminders card shows the history and offers Create reminder. Invoices that were already due before dunning started sit in the Backlog tab and are never chased by themselves. Everything else is in the article Dunning.
Following up on a quote
A sent quote has a Follow up button right in the status bar: a dialog shows the recipient and a checkbox to Attach quote PDF; confirming sends a friendly reminder email to the customer without changing anything on the quote itself. How often, and when you last followed up, is shown below the button afterward. If the quote has no PDF, no follow-up is sent.
This can also run automatically: for quotes, the Send reminders field in the header counts days after the document was sent (you chase invoices under Payment reminders, see above). Enter, say, 14 and 30 there, and Univents sends the same follow-up email automatically at those points — leave it empty and nothing happens.
With Send reminder to you decide who is reminded. With Internal only, no email goes to the customer; instead a task “Follow up on quote …” appears in your tasks on those days — due the same day and assigned to the clerk of the quote (otherwise to the event’s project lead or the owner). With Customer + internal you get both the email and the task. While a follow-up task for a quote is still open, Univents does not add a second one.
The signed quote: the signed PDF
When a customer signs a quote online in the customer portal, or a delivery note is signed on site, a signed PDF is created automatically: your document unchanged, followed by a page listing the signatures and a page with the document history including a checksum. The document card then shows the line "Signed on …" with the Signed PDF link; your customer gets the same file in the portal and as an attachment to the confirmation email.
The details — what those two pages contain, how to switch the email attachment off and how to regenerate the file — are covered in the article Having a quote signed and the signed PDF.
Order confirmation for an accepted quote
Once a quote is accepted, Create order confirmation turns it into a document of its own with its own number (number range AB): your usual layout, every line item of the quote, an opening and a closing text, and the accepted quote as an enclosure. If you like, it goes out to the customer by email in the same step.
An order confirmation confirms the quote exactly as it was accepted. If something has changed, create a new version of the quote first. The full walkthrough is in the article Creating an order confirmation.
Translating documents into another language
Every document draft has a Language field in the header. Switching it offers to switch the matching PDF layout along with it. Right next to it, the Generate missing translations button translates line-item titles, descriptions, and the document title via AI into the selected language — a review dialog shows every suggestion individually so you can tick which ones to apply; unticked suggestions are left untouched. Applied translations replace the existing text directly in the document — no second version is created. The feature is available from the Growth plan, consumes AI credits, and only works on drafts — issued documents are frozen in their language.
The language you set here also applies to the emails for this document: quote, invoice, follow-up and payment reminder all go out to the customer in exactly this language. For an inquiry, the confirmation follows the language of the event.
Frequently asked questions
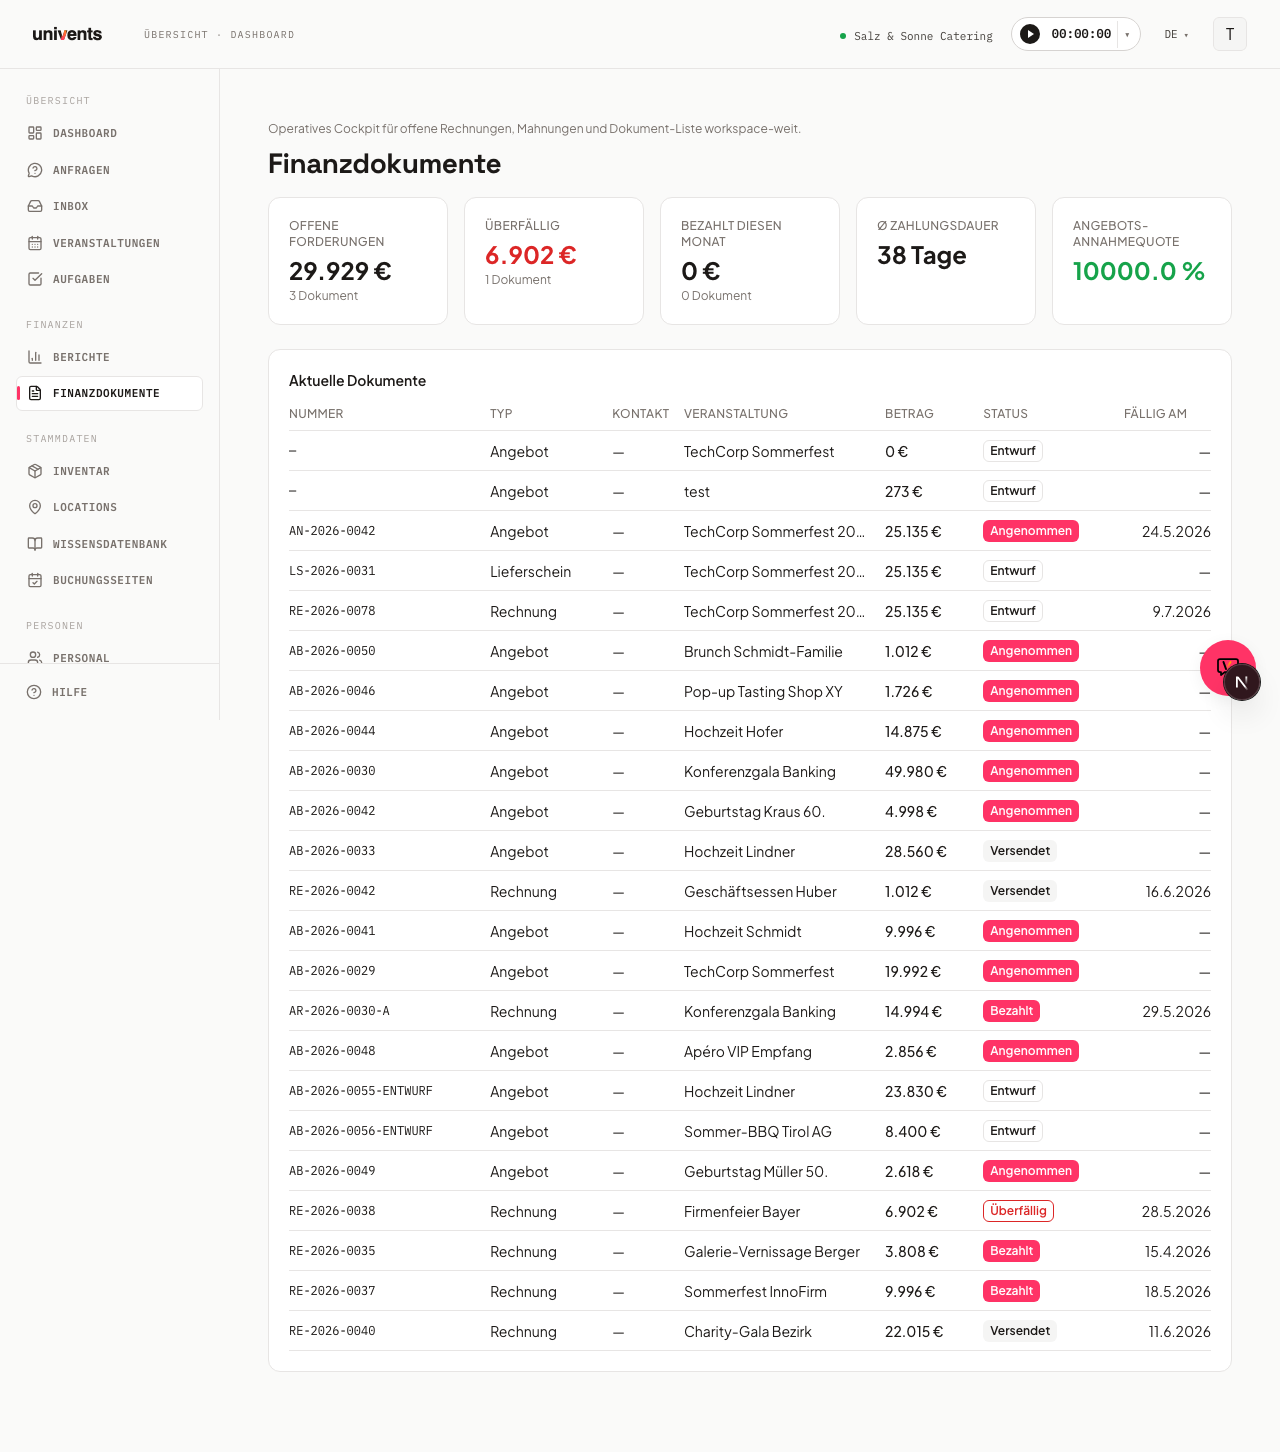
Where can I see all open invoices across the workspace? Under Financial Documents in the main menu you will find a list of all documents across all events, including KPI tiles for outstanding amounts, overdue invoices, and invoices paid in the current month.
How do I find an older document? The list shows 50 documents per page, sorted by most recently created. Use Back/Next below the table to page through the rest; the line next to it tells you how many documents the current filter matches in total. The search box above the table is faster: it searches document number, customer name and event name across all pages and combines with the type, status and date filters. Documents migrated from the old Univents are found the same way — they all carry the migration date, which is why they sit far down in the default sort order.
Why don't I see old versions of a quote in the list anymore? When you revise a quote via New version, Univents hides the replaced old version by default — both in the finance document overview and in the event's document list. That keeps it clear which quote is the current one. Use the Show replaced quotes toggle (overview) or Show replaced toggle (event document list) to bring them back; each one then carries an Old version label with a link to the current version. Invoices and delivery notes are never hidden.
What is the difference between a layout and a template? A layout determines the visual design of the PDF (colours, margins, DOCX template file). A line-item template contains reusable rows that you insert into a document with a single click. Both are configured independently of each other.
How does the reminder function work? On quotes, the Send Reminders field lets you activate chips for predefined intervals (1, 3, 7, 14, or 30 days) or enter a custom value — counted from when the quote was sent. Univents then automatically sends a follow-up email to the stored client contact — or, if Send reminder to is set to Internal only, creates a follow-up task for your team instead (both with Customer + internal). Invoices have no such field; you chase them under Payment reminders.
What happens when I issue an invoice? It gets its final number and is locked under §14 UStG — it can no longer be edited or deleted afterwards, only corrected via a credit note. Sending it by email is independent of that: issuing and sending are two separate steps, and you decide when (or whether) the invoice goes out.