

Creating Order, Packing, Delivery & Production Lists
After reading this article you will be able to generate production, packing, and delivery lists from booked products — for a single event or across multiple events at once — and print them.
In Univents, production lists can be generated in two ways: directly inside an event for a single occasion, or centrally in the Inventory for any date range spanning multiple events. Both approaches draw from the same booked products and result in a print-ready list.
The first video shows the central production list in the inventory, with its filters for period, category, supplier and order status.
Where the quantities on every list come from is shown in the second video: an event’s Bookings tab is the one list that the document, kitchen sheet, production list and packing list are built from.
You’ll find the individual steps written out below as well.
Generate a Production List Inside an Event
Every event has its own bookings area, which serves as the basis for all lists.
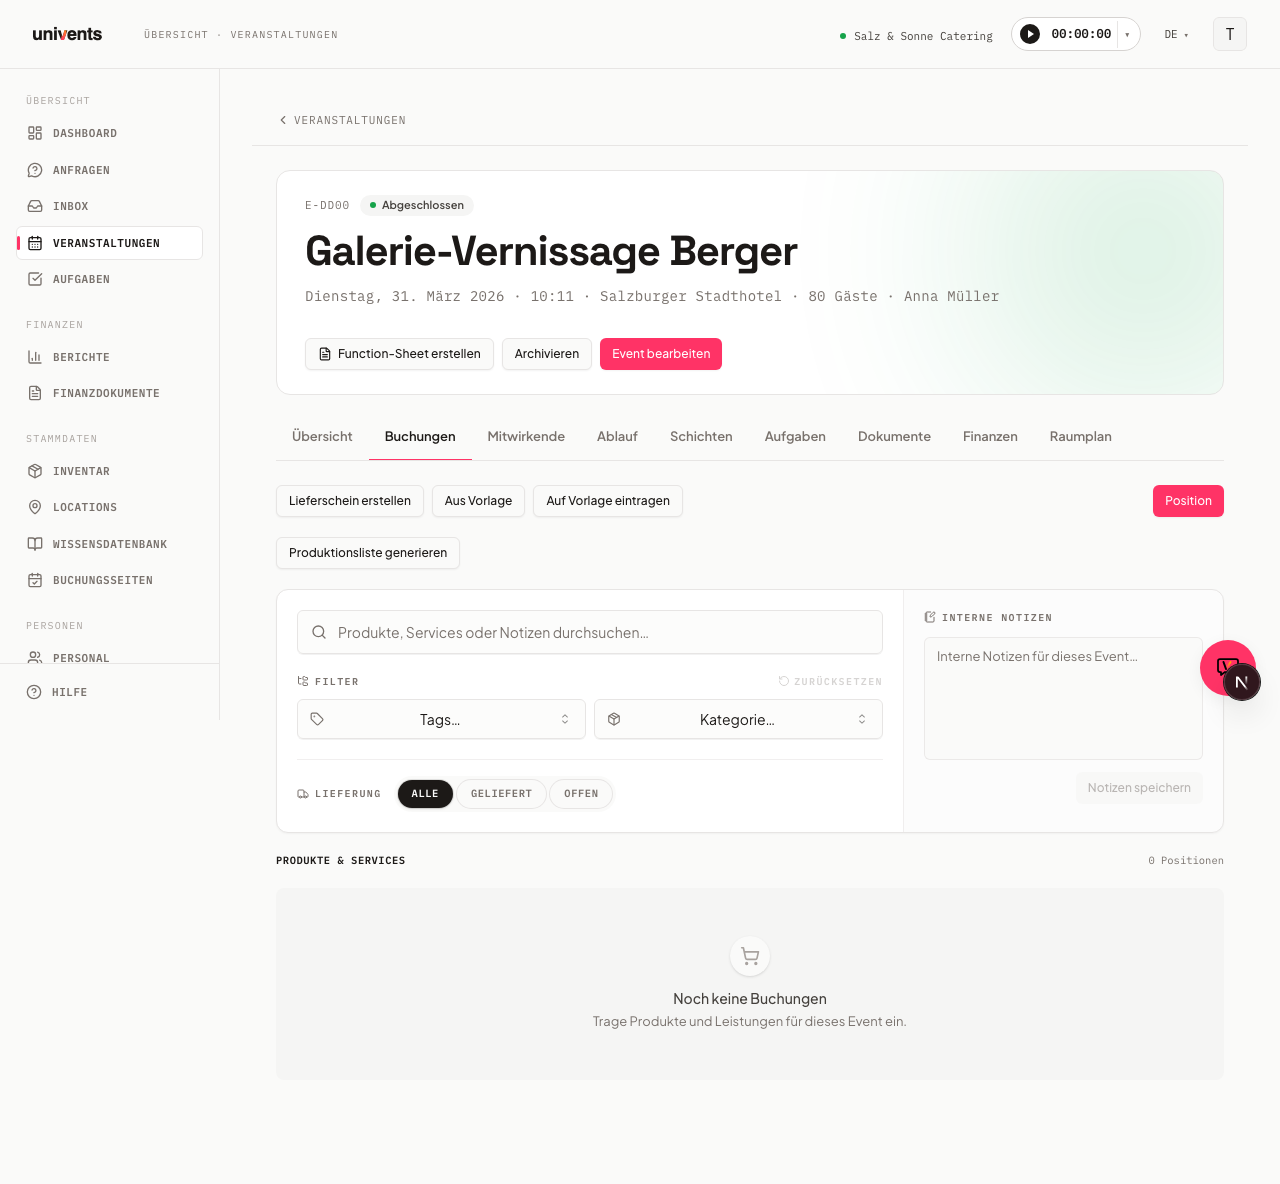
- Open the desired event and navigate to the Bookings section.
- Click Update packing list. Univents reads all entered line items and shows you a comparison first: what is added, what is dropped and where the quantity changed. A badge on the button names the number of changes.
- Nothing is written until you confirm. If you cancel, the list stays exactly as it was — not a single row is inserted, changed or deleted. Items that have already been loaded are never deleted.
- You open the print-ready PDF view via the Print button next to it. It changes nothing about the list.
The sheet is printed in the language of the event — also when the list goes out by email as a PDF: labels and dates follow it, English for an English event. Your own entries such as units and storage locations stay exactly as you entered them.
Printing also works without updating first. If you have never clicked Update packing list for an event, Univents calculates the line items live from the bookings when you print — the sheet then shows the same rows as the Bookings area, tag and category filter included. As soon as a packing list exists, Univents prints exactly that one, so checked-off quantities and retired line items are correct on the sheet.
Tip: Right next to it you will find the Attach schedule option as soon as the event has a schedule. Tick it before printing and Univents appends the schedule on its own page behind the line items — with time, title and description for each entry. If the event has several schedules, you can choose which ones to attach (e.g. only the kitchen schedule for the kitchen print, or multiple together). Without the tick, the printout looks exactly as before.
Tip: Every further update shows the same comparison before anything is written — so you always see what you are about to apply. How your team then checks the list off, records shortages and confirms loading is covered in Packing list: packing, shortages and loading.
Tip: If several people pack, say one for the bar and one for the hot kitchen, use Split & assign to divide the packing list into sub-lists by tag or category. Each sub-list can be printed on its own and assigned to a person on your team. How that works is covered in the section Splitting the packing list and assigning people of the same article.
Filtering Bookings for Targeted Lists
Before generating the production list, you can narrow down the line-item view to build, for example, a pure order list by product category or a packing list by tags.
- Use the filter bar above the line-item table:
- Tags — filter by product tags. The selection always starts with the fixed Without tag option: it shows exactly those line items that have no tag assigned — including free-text positions without an inventory article. The option is available even when the event currently has no tagged articles booked at all; if it says "No tags for this event", none of the listed items carries a tag — items you excluded from the packing list are not counted here.
- Category — filter by product categories (useful for production lists broken down by kitchen area)
- Delivery note — narrows the list down to a single delivery. When an event has several deliveries — welcome snacks, lunch and dinner, say — this shows exactly the items of one of them instead of all of them together. Without delivery note does the opposite and shows what is not on any delivery yet.
- Delivery — toggle between All, Delivered, and Open (useful for delivery note workflows)
- Enter a note for the whole list in the Internal Notes field on the right side of the filter bar and save it with Save Notes. This note will appear on the printout.
- Click Create Delivery Note in the upper-left area if you want to generate a delivery note directly from the booked line items.
The tag and category filter you set carries over to the printed production list: what you see on screen is what ends up on the sheet — including the Without tag selection. The head of the list states which filter it was generated for.
Delivery note number in the header and file name. If a delivery note is checked in the print dialog, the sheet carries its number at the top of the header and in the file name — even when the event has only one delivery note and no selection was needed. Until now the number only appeared in the file name of lists sent by an automation.
If the Delivery note filter is set to a specific delivery, the Production list for delivery note(s) print dialog already has exactly that delivery note ticked. No more printing your way through the deliveries to find the one holding the dish you were after — you can still change the ticks in the dialog freely.
Every delivery as its own sheet. With several delivery notes ticked in the print dialog, Univents normally merges their line items into a single list. Tick Separate sheet per delivery note instead — right next to Attach schedule — and every selected delivery note starts on its own page with a full head: number, title, customer, Delivery with the date and time of exactly that delivery note instead of the overall range, "Quantities: LS-… only" and the location — exactly as the sheet would look if you printed only that one delivery note. Line items that are not on any delivery get their own sheet Without delivery note when all deliveries are selected, provided there are any. A delivery note whose line items a tag or category filter has emptied out still gets its own sheet with a note to that effect, instead of disappearing. Quantities stay exactly the same: what used to read "12 × pretzel selection" on one row now reads 4 on one sheet and 8 on the other. Without the tick, the printout looks exactly as it did before. The option only appears when the event has more than one delivery note, and can only be ticked once at least two of them are selected.
Every station as its own sheet. With several tags selected in the filter, the print dialog also offers Separate sheet per tag. Handy if your kitchen tags by station (e.g. hot kitchen, cold kitchen, hot production, cold production) and you used to have to filter and print separately for each one: tick it and every selected tag gets its own sheet with its own head and its own filter line. A row that carries two of the selected tags appears with its full quantity on both sheets — the kitchen needs to see it at every station. A sheet still prints even when there is nothing to do for that station, instead of simply being missing. Separate sheet per tag and Separate sheet per delivery note are mutually exclusive: ticking one automatically unticks the other — combining several delivery notes with several stations would otherwise produce a lot of mostly empty sheets. The option only appears once at least two tags are selected in the filter.
The tag filter checks the row's own tags. The material view and the production list do not show the booked bundles but their components. Pick a tag in the filter and you see exactly the rows that carry that tag themselves — not the ones whose parent dish carries it. If a dish carries the tag "hot kitchen" and its components carry the tag "hot production", say, then "hot kitchen" filters only by the dish itself and "hot production" only by its components — so kitchen stations stay cleanly separated even when the dish and its components are tagged differently.
A dish with components as its own row. A bundle with components is not, by default, its own row on the production list — only its components are printed. If the dish itself should also appear as a row (for example "Boneless chicken thigh 75" on the "hot kitchen" sheet, while its semi-finished components sit on the "hot production" sheet), turn on the Produced in the kitchen toggle on the product under Master data in Inventory. That is all it takes: the dish then appears as its own row with its components as sub-rows on the production list — the components remain separate rows as well. Afterwards, click Update packing list once so existing lists pick up the new row. You do not need the Use for kitchen production checkbox in the Production section for this — it only decides whether the dish also shows up on the kitchen monitor.
The filter's option list shows the tags of every row that can appear on the sheet — both components and dishes marked to appear as their own row.
Which sheets you already printed. Directly below Print production sheet you will find the Last printed section: one line per sheet with its scope (the selected tags, or "All positions"), the delivery notes, date and time, and the person who printed it. Sheets sent by an automation are listed as Automation. If you print the same sheet several times, it appears only once — with the most recent timestamp. After an interruption you can see at a glance which station is still missing. If nothing has been printed yet, the line reads "No production list printed yet."
Unconfirmed positions sit at the bottom. The material view has a group called Not confirmed, and it is always last. Everything you offered the customer but they have not confirmed yet collects there; the heading carries the note "Offered, not yet confirmed by the customer." Until now such a position could sit right at the top and look like the most important one in the kitchen. In the Positions view, unconfirmed rows move to the end for the same reason. Nothing changes on the printed sheet: unconfirmed positions are still listed there.
Adding a Note to a Single Position
Besides the global note for the whole list, every individual line item can carry its own note — e.g. "no onions" or "customer special request":
- In the line-item table, click the note icon on the desired row.
- Enter the text in the field that opens and confirm with Save. A filled, coloured icon then shows that the position carries a note.
- In the summarised view (Aggregated), the same icon appears on the combined row as soon as at least one of its underlying positions has a note — clicking it opens a dialog with all associated positions for editing.
On the production list printout, each position's note is shown in its own Notes column on the right of the table, instead of appearing small underneath the item description like before.
Which Unit the Printout Shows
The Unit column on the printout shows the product's unit (product form, Price & stock → Unit) — "jar", "platter", "g" or "bottle" rather than a generic "piece". The number in the Quantity column counts in exactly that unit; the same applies to the components listed under a bundle or recipe.
Three things to know:
- The package (e.g. "crate") never labels a raw quantity — "110 pieces" would otherwise become "110 crates". Quantities are only converted into packages in the Packed view (see below).
- If a product has no unit set yet but a package that holds exactly 1 unit, Univents prints the package name — it is the same quantity. Once you enter "jar" as the unit, the printout no longer depends on it.
- The value is read from the product at print time. You do not have to regenerate an existing production list after adding or correcting the unit in Inventory.
Removing Several Positions at Once
If you loaded a template and only need part of it, you do not have to delete the surplus rows one by one:
- In the Bookings area, open the Positions view — or the Material view and then Positions. The checkboxes exist in both.
- Tick the checkbox on the left of every row you want to remove. The checkbox in the header row selects all positions currently shown — combined with the filters for category, supplier or storage location this lets you remove, for example, all drinks in one go.
- A bar appears above the table showing how many positions are selected. Click Remove positions there and confirm in the dialog.
The confirmation always states the exact number. Removed positions are permanently gone from the event afterwards — exactly like deleting a single row via the bin icon.
Parts of a package and ingredient rows from an adopted recipe carry no checkbox of their own: they belong to their parent position and are removed together with it.
Sending Supplier Orders Directly
Once a production list exists and products have been assigned to a supplier, the Supplier Orders section appears automatically above the filter bar.
- Univents groups all line items by supplier.
- Click Send to [Supplier] to dispatch the respective order. A status pill then indicates whether the order is marked as Sent, Confirmed, or Rejected.
- Use Send All Open to dispatch all groups at once for which no order has been sent yet.
Products without an assigned supplier appear in the No Supplier group and cannot be sent directly.
Orders for an event do not turn into a second order when you send them again: as long as the order has not been delivered and no goods receipt has been recorded, Univents updates the existing order — more on this under Creating, Sending & Closing Supplier Orders.
Central Production List for Multiple Events
If you want to plan centrally for an entire week or any other date range, use the Production List tab in the Inventory.
The cross-event production list is included from the Core plan — same as the per-event production list (see above). On a smaller plan the tab shows a notice instead of the list, from which you can try the feature free for 14 days or upgrade.
This central overview shows all bookings of every non-cancelled event in the selected date range live — exactly like the Bookings area of a single event, just across every event. You do not need to have clicked Update packing list inside any event beforehand; a booked line item shows up here immediately. The Update packing list button inside the event still matters, though — it is the basis for the production status (Preparation / In Progress / Done) that this central overview displays once it has been set.
- Navigate to Inventory in the main menu and select the Production List tab.
- Choose a date range in the upper right: 7D, 30D, 90D, or Custom with a freely selectable From/To date.
- Select a display mode:
- Aggregated — combines identical products across all events and shows the total quantity
- By Event — displays each event as its own group with the production status per line item
- Positions — a flat list of all individual line items with status badges (Preparation / In Progress / Done)
- By Production Category — groups items by the stored production categories and subcategories
- Refine the view using the filter bar: Tags, Category, Supplier, Storage Location, and Event can be combined independently. In Aggregated display mode, an additional Order status filter is available (see the next section).
- Toggle between Raw Quantity and Packed when products have a package with Units per package defined — Univents will automatically convert quantities into packages.
- Click Print. Univents opens your browser's print dialog with exactly the list currently on screen — the same display mode, the same filters and the same raw/packed toggle. A header line above the list states the mode, date range, number of line items and the print date. From the print dialog you can also save as a PDF as usual.
Order Status and Open Quantities in Aggregated Mode
Two additional tools are available only in Aggregated display mode, and they answer directly what you still need to order from the supplier.
Order status filter — filters the aggregated rows by whether the underlying customer bookings are already confirmed, not by whether an order has already been placed with the supplier:
- All statuses — no restriction
- Unconfirmed — the required quantity doesn't yet come from any confirmed booking
- Partially confirmed — part of the required quantity is confirmed, part is not
- Customer confirmed — the entire required quantity comes from confirmed bookings
This lets you separate uncertain (not yet confirmed) demand from firm demand before placing an order.
Ordered and Open columns — independent of the order status filter, every row in the aggregated table also shows:
- Ordered — the quantity already sent or confirmed via a supplier order
- Open — the difference to the required quantity, highlighted in red as long as it's greater than zero
Together, the order status filter and the Open column answer what still needs to be ordered for a product, without you having to manually cross-check bookings against supplier orders already sent.
Bundle Items and Components
For bundle items, the production list now displays a Components block under the line item showing the required quantity for each component. The quantity is calculated as component factor × booked quantity of the bundle — allowing your kitchen to work directly from the production list without having to calculate how many individual ingredients are needed for all booked bundles. This block appears in readable form on the printed production list and helps your kitchen team avoid missing any components.
If a component already has its own row on the same sheet via the Produced in the kitchen toggle (see above), it no longer appears a second time in the Components block — the row's own quantity already accounts for the full amount, so a second entry in the block would double it. If you also filter by tags, the block likewise only shows the components that themselves carry one of the selected tags — the same rule a standalone row follows.
If a component has a content per unit set (e.g. 1 bottle = 1,000 ml, see Creating & configuring products), the block shows the quantity in the base unit with the unit in brackets, e.g. "10,000 ml Adelholzener (10 bottle)". Components without content still show only in their unit.
Frequently Asked Questions
Why are some products missing from the production list? The production list is based on the current state of bookings. Line items that are not assigned to an active event, belong to a cancelled event, or fall outside the selected date range will not be shown. Check the date range filter and verify that the event has the correct date. In the central Inventory overview, the server loads a default window of 30 days back to 90 days ahead; a notice appears if that window contains more line items than are shown.
Can I print a list for a single product category? Yes. In the event's Bookings area, set the Category filter to the desired category before generating the production list. In the central Inventory tab, use the same Category filter in the filter bar.
What is the difference between Raw Quantity and Packed? Raw Quantity shows the required amount in the product's unit (e.g. 40 kg of flour). Packed automatically converts to packaging units when a packaging size is defined on the product (e.g. 80 packs of 0.5 kg each). If no packaging size is defined, a warning icon is shown and the raw quantity continues to be displayed.
Where do I enter notes that should appear on the printout? There are two levels: the Internal Notes field on the right of the filter bar applies to the whole list. For a single position, click its note icon in the line-item table instead — that note appears on the printout in its own Notes column.
How do I get entries out of the central production list again? The central overview is a live read-out of your bookings, not a list you maintain by hand – which is why there is no delete button. A row disappears once its basis does: remove the line item in the relevant event's Bookings area and it is gone from Inventory right away — no need to generate again. Cancel or delete the event and its rows go with it as well.