

Event Finances: Revenue, Costs & Margin per Event
After reading this article you'll know how to read revenue, planned and actual costs, contribution margin, and payment status at a glance in an event's Finance tab, how to add cost items or invoice instalments, how to upload, review, correct, cancel, assign supplier invoices to a budget envelope, link them to a supplier contact, keep an eye on their due dates and tick off what you have paid — and where to find every supplier invoice across all events and capture overheads without an event.
The Finance tab gives you a complete controlling overview for each event: what you're earning, what you plan to spend, what has actually been incurred, and how much the client has already paid.
How to get there: sidebar Events → click the event → in the tab bar above the content, click Finance.
Three places are called "Finance" — this is the third one. The sidebar heading Finance holds Reports (workspace-wide analyses across all events) and Finance Documents (the list of every quote, invoice and delivery note). The Finance tab this article is about is not in the sidebar — it always lives inside one specific event.
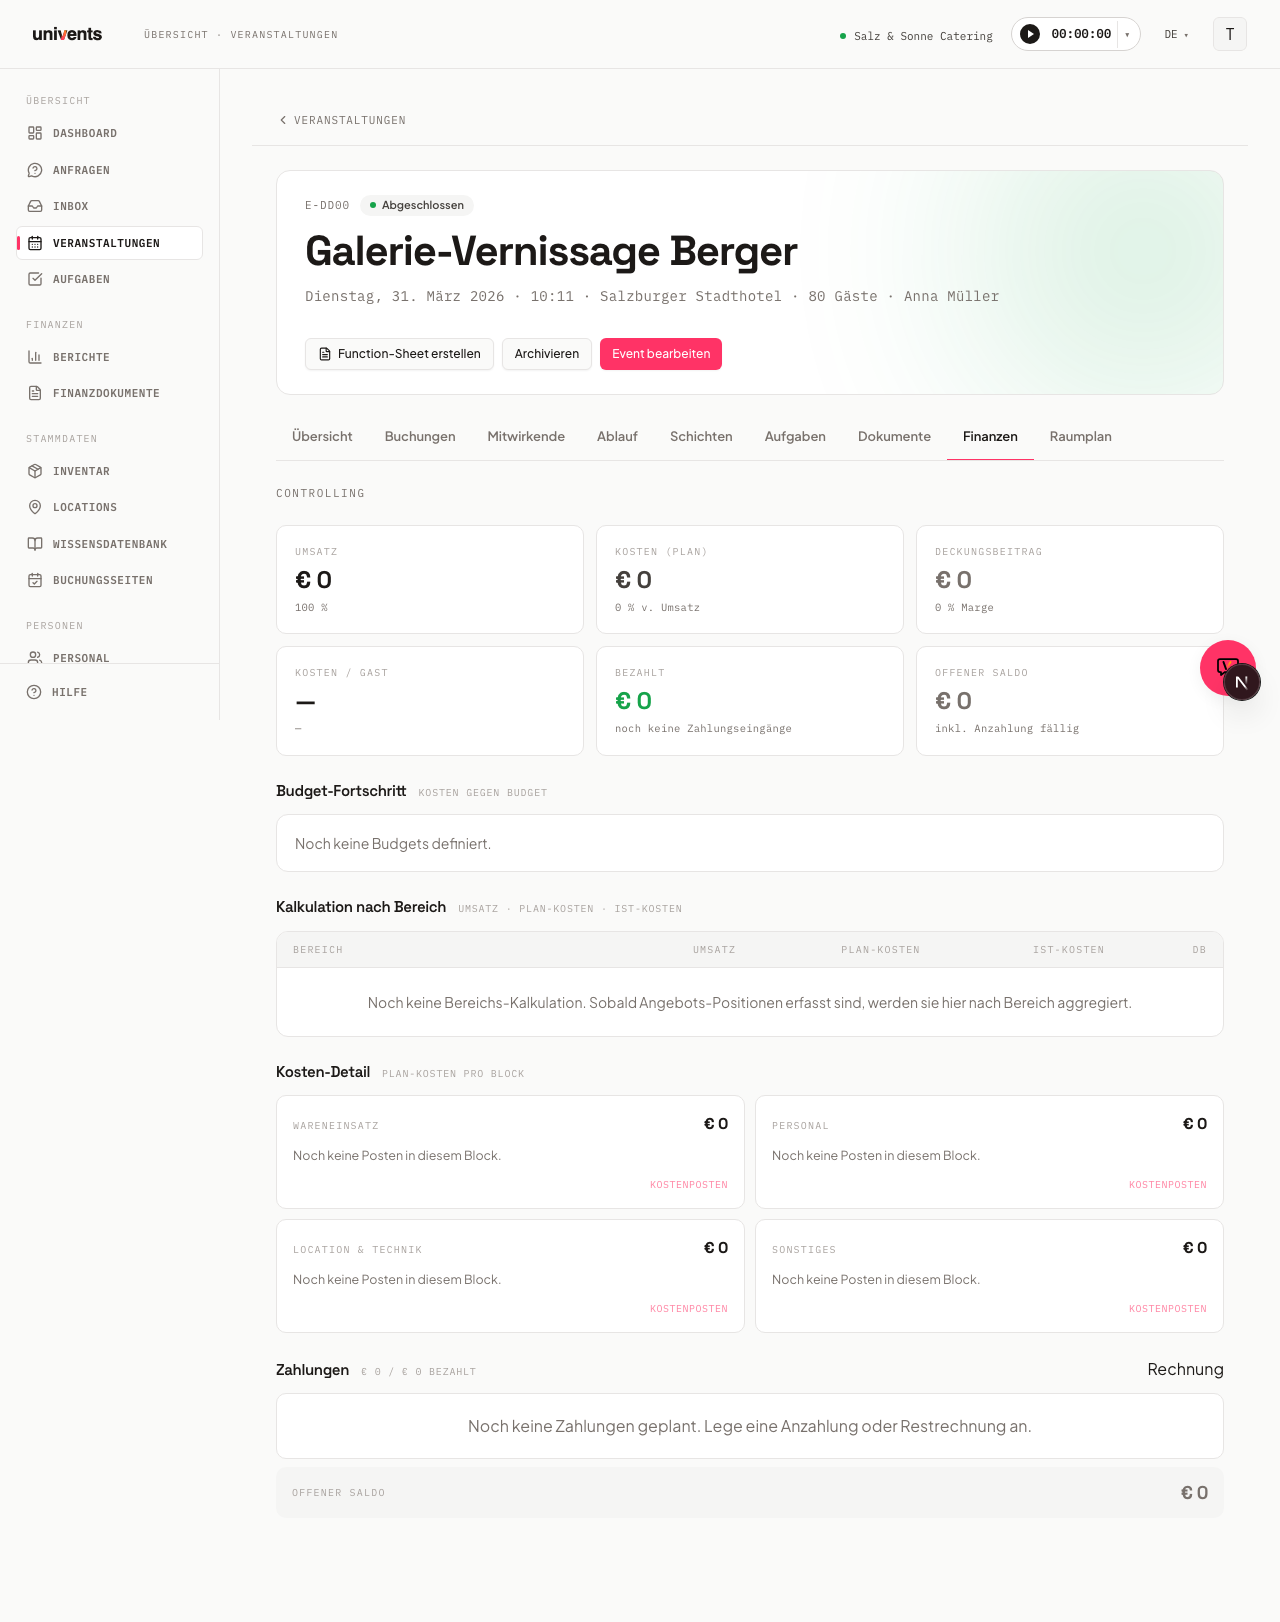
KPI Overview (Controlling)
At the very top you'll find seven KPI cards:
- Revenue — total income for the event (gross), with the same amount net below it
- Costs (Plan) — the purchase prices of the line items on your quote or invoices plus your cost items, shown as a percentage of net revenue. If line items have no purchase price, the card says how many
- Spend (Actual) — what was actually spent: the actual amounts of your cost items plus every booked supplier invoice. Payments received from and refunds paid to your customers never count here. Below it you'll see what percentage of the planned costs that is; above 100 % the value turns red
- Margin (Plan) or Margin (Actual) — net revenue minus costs; green when positive, red when negative. Until the event is over, the card uses the planned costs and is called Margin (Plan); if expenses are already booked, the provisional actual value is shown below it. Once the event is over and at least one expense is booked, it uses the actual spend, is called Margin (Actual) and shows the planned value below it for comparison
- Cost / Guest — planned costs divided by guest count (only appears when a guest count has been entered)
- Paid — payments already received, as a percentage of total revenue
- Outstanding Balance — amount still due; red while no payment has been received, orange after a partial payment
Where does revenue come from? From exactly one document level: if there are issued final invoices (not drafts, not cancelled), those count. Otherwise the accepted quote counts, then the newest sent quote, and only if there is none, the newest draft quote. Delivery notes, deposit invoices and copies of the same quote never count on top — a deposit offset in the final invoice counts exactly once. Items inside a bundle do not count on top of the bundle price.
Where do planned costs come from? From the same documents as revenue: Univents takes the purchase price of every line item of the same documents the tab uses for revenue. A document without line items (for example an invoice with only a total) contributes no purchase price. Discounts do not lower the purchase price. On top come the cost items you add here in the Finance tab. If you changed the planned amount of a category by hand in the Budget on the event overview, your amount counts for that category instead of the purchase prices — never both. The amounts Generate auto-budget enters there are the sales prices per category and therefore do not count as costs. Shifts are not included here; their planned costs are in the Planned / Actual Hours (Staff) section.
If a line item has no purchase price, its cost is missing from the planned costs and the margin looks too good. That is why Costs (Plan) and the affected block show how many line items have no purchase price. Add the purchase price to the line item in the document; if you also store it on the product in the inventory, future line items bring it along.
The margin always uses net revenue, because costs are recorded net as well.
All values update automatically as soon as you change cost items, supplier invoices or payments.
Revenue and the per-area rows come from the event’s quotes and invoices — you don’t edit the documents themselves here, but in the Documents tab. The Edit quotes & invoices link in the top right takes you straight there.
Budget Progress
The Budget Progress section shows a progress bar for each cost block, indicating the ratio of actual costs to planned budget:
- Bar green: less than 85 % used
- Bar orange: 85–100 % (warning threshold)
- Bar red: budget exceeded
To the right of each bar you'll see the amounts in the format Actual / Plan along with the percentage. This gives you an immediate picture of where you still have headroom and where you need to take action.
Breakdown by Area
The Breakdown by Area table splits revenue and costs by the product categories of the line items. It is based on the same documents as the revenue above (see “Where does revenue come from?”). The columns are:
| Column | Content |
|---|---|
| Area | Product category of the line items |
| Net revenue | Net income from the line items in this category |
| Plan Costs | Purchase prices of the line items in this category — or the budget you set by hand for this category |
| Actual Costs | Expenses actually booked for this category |
| Margin (Plan) or Margin (Actual) | Contribution margin, following the same rule as the KPI card: planned costs until the event is over, actual costs after that once an expense is booked |
Up to three special rows are added when needed:
- Uncategorized — line items without a product category
- Document discounts and adjustments — a discount or surcharge on the whole document that is not part of any single line item
- Costs without area — cost items and booked supplier invoices that are not assigned to a product category (the usual case for supplier invoices)
The bottom row (Total) adds up the rows above it and shows exactly the values of the KPI cards: net revenue, Costs (Plan), Spend (Actual) and margin. The margin in the total row is coloured by the same rule as the rows.
Cost Detail
Under Cost Detail you'll see all individual cost items, grouped into four blocks: Cost of Goods, Staff, Venue & Equipment, and Other. Each card shows the block total as well as the individual line items with their name and amount.
At the top of a block you may see the row Purchase cost per quote … (or per invoice …) with the document number: the purchase prices of the line items that fall into this block. It cannot be deleted — it changes when you change the purchase prices in the document. The block depends on the name of the product category (for example “Staff” → Staff, “Venue” → Venue & Equipment); anything that fits no block goes to Cost of Goods. Line items without a purchase price are mentioned as a note below the items.
To add a new cost item:
- Click Cost Item inside the card of the desired block.
- Select the Cost Block in the dialog.
- Enter a Name, Plan Costs (€), and optionally Actual Costs (€).
- Add a Note if needed.
- Click Add — the item appears in the card immediately.
You delete a cost item with the trash icon next to it. The Delete cost item? dialog shows the name and amount; confirm with Delete and the item no longer counts toward planned costs. You need the role permission “Finances – Delete” for this. The AI chat can also delete cost items and asks for confirmation first.
You can see a quote’s margin before sending it in the totals block of the quote editor: Cost (net) shows the purchase cost of that single quote (for a single quote with a purchase price on every line item this matches the planned costs in the Finance tab), Margin (net) the margin of that quote without your additional cost items.
Planned / Actual Hours (Staff)
The Planned / Actual Hours (Staff) section compares the shifts you planned against the working time actually recorded. As long as no shifts have been planned and no time logged for the event, you'll see the message "No shifts planned for this event yet."
Once shifts exist, the first row shows three values:
- Planned (Target) — total shift hours from your staff plan (each shift's duration × the number of staff required)
- Recorded (Actual) — total actual working time from staff time entries (breaks are subtracted). This counts both ways an entry can belong to the event: entries where the event was picked directly, and entries recorded against a shift of this event. Until 23 Sept 2026 only the first way counted, which made the number far too low on most events.
- Difference — Actual minus Planned; a positive value means more hours were worked than planned
If a time log is still running (a staff member hasn't clocked out yet), a hint under Recorded (Actual) shows how many time logs are still open — those entries only count toward the actual hours once the staff member clocks out.
Hours by activity
If your workspace uses activity types and at least one recorded entry has one, the block Hours by activity appears below the hours: the actual hours split by travel, set-up, service and whatever else you set up, largest first. Hours without an activity are listed separately below, and the total matches the actual hours exactly.
Setting target hours manually
For projects whose hours are not planned through shifts — typical for pure agency work — you can set the target directly: click Adjust target at the top right of the card and enter the number of hours.
- The value you enter replaces the shift-derived target, it is never added on top. From then on the difference is calculated against that value.
- The target is labelled manual, and a line below reads e.g. "76 h target (manual) · 24 h of that planned via shifts · 52 h without a shift" — so it stays visible how much of it is actually scheduled as shifts.
- 0 hours is a valid value. Clearing the field therefore does not reset anything; the dialog has its own Reset to shift-derived target button for that.
- Planned costs stay shift-based. A manual target carries no hourly rate, so no amount is extrapolated from it — instead the card states how many shifts the planned costs come from.
While a manual target is set, the card always stays visible — even at 0 hours and with no shifts at all. Every change appears in the event's history. You need edit rights for Finance and write rights for Events.
Below that is the cost row:
- Planned Costs — the planned staff costs. Unfilled shift slots are calculated with the rate of the staff product attached to the shift (rate × number of staff × hours: two service staff for seven hours at €31.90/hr comes to €446.60). As soon as someone signs up for a shift, their slot is calculated with their own hourly wage from their wage product instead — the plan gets more precise the more fully the shift is staffed. Assignees without a wage on file fall back to the product rate.
- Actual Costs — the actual staff costs, calculated from completed time logs. Until a cost value can be calculated from a completed time log (e.g. because an hourly rate is linked to it), this shows a dash instead of an amount.
- Difference to plan — actual minus planned costs, once actual costs are available
If the shift product's rate differs from the wage product of the assigned staff, a hint below the planned costs shows the number of affected shifts — a sign that the shift product or the staff record should be updated.
Both figures are totals and therefore directly comparable. If the planned costs can't be determined, the entire cost row shows a dash — rather than a difference based on a zero.
A third row covers the revenue side:
- Sale value of tracked time — what the billable tracked hours are worth at the sale rate: net hours × sale rate of each person's wage product (the same rate used when adopting tracked time into an invoice). Entries marked as non-billable produce no sale value, but their wage costs still count. Entries from people without a wage product or sale rate are counted and flagged with a hint.
- Margin — sale value of tracked time minus actual costs; green when positive, red when negative. Only appears once both sides are reliable — if there are tracked entries whose wage cost could not (yet) be calculated, a hint is shown instead of a half-true number.
Both rows require access to the staff module — without it, the cost and revenue side of the card shows dashes, because otherwise only the viewer's own time entries would flow into the totals.
This gives you an at-a-glance view of whether an event used more or fewer staff hours and cost more or less staff budget than originally planned — and what the hours worked are worth to the customer.
Recalculating missing labor costs
If Margin shows the note "X time entr(ies) without labor cost", the hourly wage of that person was missing when the time was tracked — time without a wage carries no cost, and the margin would only be half true.
How to resolve it:
- Enter the hourly wage in that person's staff record (Open staff list right below the note). The wage lives on the person's payroll product, in the purchase price field.
- Then click Recalculate labor costs in the finance tab. Univents applies the stored wage to the time already tracked for this event.
Only entries that have no cost yet are recalculated — entries that already carry a cost stay untouched, even if the wage changed since. If a person still has no wage on file, Univents says so and deliberately leaves the entry without a cost. The button is only visible to people allowed to manage working time.
Payments
The Payments section lists all planned invoice instalments (deposit, interim invoice, final invoice). Each row shows the reference, name, due date, amount, and the status paid or open.
At the bottom of the section the current Outstanding Balance is always displayed — the difference between total revenue and payments already received.
To add a new instalment or invoice:
- Click Invoice to the right of "Payments".
- Enter a Name and Due Date.
- Enter either the Share (%) or the Amount (€) — Univents automatically calculates the other value.
- Click Add. If no invoice exists for the event yet, a draft is created automatically.
Budget Envelopes
A budget envelope is a pot you assign a net amount to (for example "Drinks" or "Technology"). Every booked supplier invoice you assign to that envelope reduces the remaining amount.
To create an envelope:
- In the Budget Envelopes section, click Envelope.
- Enter a name and the net budget (€).
- Optionally set the alert threshold (%) — the envelope is flagged once it is used up to that level. The default is 80%.
- Click Create.
There are two kinds of envelope:
- Event envelopes — created here in the Finance tab, they belong to exactly this event.
- General envelopes — they belong to no single event but to the whole workspace. You create them under Finance Documents › Supplier invoices in the Without an event section.
Both are offered when you pick an envelope in the review dialog; the general ones are marked General. An invoice without an event, on the other hand, can only be booked against a general envelope — Univents rejects an envelope that belongs to another event.
Reusing envelopes as templates
If every event carries the same pots, you do not have to retype them. In the Budget Envelopes section the Templates button opens a window that works in both directions:
- Store current envelopes — saves this event's envelopes as workspace templates. Name, budget and alert threshold are carried over; the amounts already spent are not, because a template is a blueprint, not a balance.
- Apply — creates the ticked templates as envelopes of this event. Everything still missing here is pre-selected.
A template that already exists here as an envelope is greyed out and marked already here: a second pot with the same name would split the actual costs across two rows, and both would look under-budget afterwards.
The bin icon removes a template after a confirmation. Envelopes already created stay untouched. The same templates are available for the general envelopes under Finance Documents › Supplier invoices in the Without event section.
Supplier Invoices
Under Supplier Invoices you upload invoices from suppliers and partners — as a PDF or as a photo (JPEG, PNG, WebP), for example taken straight with your phone. Univents extracts the vendor, invoice number, date, and amounts automatically; you check the values and then book the invoice against the event.
Upload and extract
- Click Upload invoices and drag one or more PDF or photo files into the dialog (or take a photo of the receipt with your phone).
- After the upload each invoice shows Pending and is extracted automatically a moment later. Process now starts the extraction immediately.
- Once the status reads Ready for review, you can check the invoice.
Photos in HEIC format (the iPhone camera's default when set to "High Efficiency") are not supported. Switch the camera to Settings → Camera → Formats → "Most Compatible", or upload a JPEG/PNG instead.
Review and book
- Click Review & book on the invoice.
- The dialog shows the uploaded file (PDF or photo) at the top and the extracted fields below it. Compare the amounts against the document and correct anything that is wrong. An empty field means Univents could not read it with confidence — fill it in by hand.
- Pick the matching envelope under Budget envelope. Use + New envelope to create one right here.
- Click Book. The invoice now counts as an actual cost of the event, and the amount is spent from the envelope.
Link the supplier to a contact
Under Supplier (contact) you can link the supplier — in addition to the extracted name — to a real contact from your address book. This is optional — booking still works without a linked contact — but it makes reports like "spend per supplier" group correctly instead of counting "Metro" and "Metro AG" as two different suppliers.
- When the dialog opens, Univents suggests matching contacts for the extracted supplier name. Even with exactly one match, nothing is linked automatically — you always pick it deliberately.
- If no contact matches, click + Create "<name>"; the new contact is selected immediately, no reload needed.
- You can set or change the linked supplier contact at any time, including on an already-booked invoice, in the same dialog as the correction (pencil icon). This never changes amounts or the budget envelope.
View or download the file
Every row has two icons on the right: the eye opens the uploaded file in a new tab, the arrow downloads it. This works in every status, including after booking.
Change the envelope later
On a booked invoice, click Change envelope, pick a different envelope (or No envelope) and save. The spent amounts of both the old and the new envelope are recalculated immediately.
Correct a booked invoice
If something is wrong on an invoice that has already been booked, click the pencil icon. You can change the supplier, invoice number, invoice date, due date and the net, gross and VAT amounts. The document — PDF or photo — sits above the fields just like when reviewing, so you can compare directly.
A changed net amount is more than a display fix: it is the amount that counts as the actual cost of the event and that the budget envelope spends. Both are updated as soon as you save. That is also why a booked invoice cannot be left without a net amount.
The envelope is not changed here — use Change envelope for that.
Delete or cancel an invoice
Every row has a bin icon on the right. What it does depends on whether the invoice has been booked:
- Not booked yet (status Waiting, Reading, Ready to review or Reading failed): the invoice is removed from the list. The costs of the event do not change, because nothing had been booked.
- Booked: the invoice is cancelled. The booked cost is taken back out of the budget envelope and the actual costs of the event go down accordingly.
In both cases a dialog asks first and states the consequences. The uploaded file stays stored as a record and is not deleted with it.
Due dates and payment status
Every invoice shows its due date — in the Finance tab as well as in the workspace-wide list. It is picked up automatically during extraction; you can set or change it under Due on in the review and the correction dialog.
- If an unpaid invoice is overdue, the row is marked accordingly. If it falls due within the next seven days, it reads Due soon.
- If no due date could be extracted, the row reads No due date. That is deliberate: it shows you where a value is missing instead of letting the invoice pass for "not urgent".
A booked invoice additionally has a Paid checkbox. Tick it once the invoice has actually been transferred; a second click takes the mark back.
Paid is not the same as booked. Booked means: the invoice counts as an actual cost and consumes its budget envelope. Paid means: the money has left your account. The checkbox therefore changes nothing about your costs, the event's figures or the budget envelope — an envelope shows what you have committed to, not what has already gone out.
You tick the box on an invoice that is already booked. On a draft there is nothing to pay yet — book it first.
Every supplier invoice across all events
Open Finance Documents and click Supplier invoices in the top right. That page lists every supplier invoice captured in this workspace, newest first — no more opening each event one by one.
- The tabs Open, Booked and All filter by status. "Open" is preselected and holds everything that is not booked yet.
- The two date fields narrow the list down to a range on the invoice date. Invoices whose date has not been extracted yet do not appear while a range is set.
- The top right shows the count and the net total of the current selection. Both numbers always cover the whole selection. With a lot of invoices the list below shows only the most recent ones and says so underneath the table — narrow the date range to see the rest.
- Every row shows vendor, invoice number, invoice date, due date, payment status, net amount, event and status. Clicking it takes you to that event's Finance tab.
- The By due date switch orders the list by due date instead of by capture date. Invoices then sit under headings: Overdue, Due within the next 7 days, Due later, No due date and Paid. Invoices without a due date deliberately get their own group so they stand out and you can add the date.
Invoices that belong to an event are still uploaded, reviewed, booked, corrected and cancelled in that event's Finance tab. In the list you look them up.
Invoices without an event (overheads)
Insurance, rent, vehicles, software — not every supplier invoice belongs to an event. On the same page, below the list, you will find the Without an event section. It works exactly like the area in the Finance tab, just without an event:
- Under Budget envelopes, create one or more general envelopes (for example "Insurance", "Vehicles").
- Under Supplier invoices, upload the documents — PDF or photo, as everywhere else. Univents extracts vendor, number, date and amounts automatically.
- Check the values, pick a general envelope and click Book.
Correcting, cancelling, deleting, changing the envelope, linking a vendor contact and the paid mark all work exactly as they do for an event. These invoices do not count towards any single event's actual costs — they only consume their general envelope.
In the list above you recognise them by Without an event in the event column; those rows are not links, because there is no Finance tab for them to lead to.
Which plan is this in?
Supplier invoices and budget envelopes are available from the Core plan — in the workspace-wide list just as in an event's Finance tab. If you have already captured supplier invoices and your plan no longer covers them, they stay visible: you can still view the list, the envelope totals and the uploaded documents, and download them. Uploading, triggering extraction, booking, correcting, deleting and cancelling, changing the envelope, linking the supplier contact, the paid mark, and creating, editing or deleting envelopes are locked.
Who may book, correct and cancel?
Editing, deleting and the paid mark require the Edit right in the Finances area; booking additionally requires Create, and cancelling an already booked invoice additionally requires Delete. Without Edit you still see the payment status but cannot change it — the checkbox is greyed out. If you are missing a right, the corresponding button does not appear at all — and if you try anyway, Univents stops before anything is half-written. Rights are assigned under Settings › Roles.
Frequently Asked Questions
The KPI cards show "—" instead of a value. Cost per guest only appears when a guest count has been entered for the event. Check this in the Details tab of the event.
The margin is red even though revenue is high. This happens when costs exceed net revenue — the planned costs for Margin (Plan), the booked expenses for Margin (Actual).
Costs (Plan) shows 0 € although the quote has line items. Then none of the line items has a purchase price — the card says how many line items are affected. Add the purchase prices to the line items in the document.
Instead of the figures, a note says they could not be loaded. An error occurred while loading. Univents deliberately shows no zeros in that case, so you don't mistake wrong numbers for real ones. Reload the page; if the error persists, contact support. Review the cost blocks in the Cost Detail section and adjust either the planning or your quoted price.
A cost item does not appear in a category row of the Breakdown by Area. Cost items and supplier invoices usually carry no product category. They therefore appear in the Costs without area row and count towards the total. Broken down by cost block, you'll find them in Budget Progress and in Cost Detail.
A cost appears twice in "Spend (Actual)". Then it was entered twice: once as a cost item with an actual amount, and once as a booked supplier invoice. Both count as real spend. Delete one of the two entries — Cost Detail shows you which individual items a block is made of.
The payment status on a row does not update automatically. The open or paid status is not automatically synced against external accounts in Univents. Update the status directly in the associated finance document for the event.