

Managing Contacts & Companies
Create, link, and import people and companies via CSV, and manage them in the CRM alongside all their events, requests, and finances.
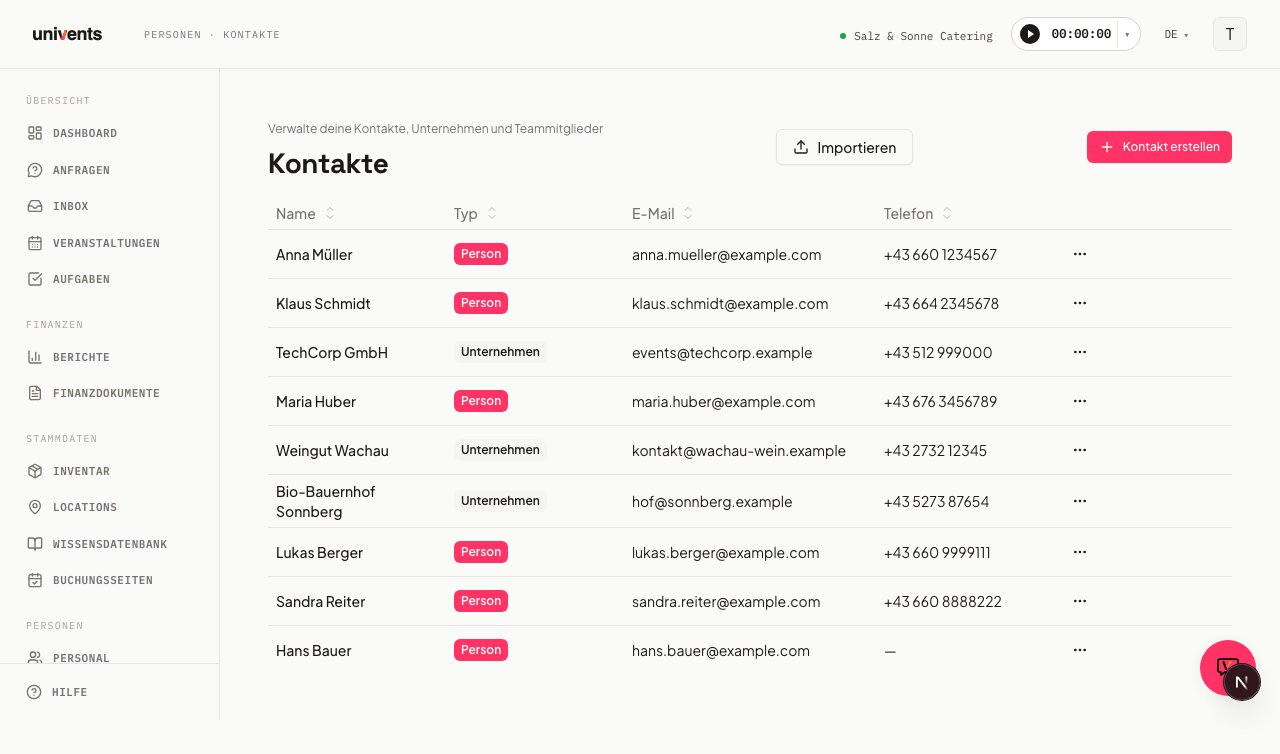
In the contacts area, you organize all your people and companies in one central place, whether they're customers, temporary staff, partners, or suppliers. Every contact comes with a complete CRM overview: all events, requests, finance documents, calls, and notes in one place.
The video shows how to import and filter contacts, assign an owner, track emails and calls and link companies with their contact persons.
You’ll find the individual steps written out below as well.
Opening and searching the contacts area
You'll find the area in the main menu under Contacts. At the top, you can see at a glance how many contacts you have in total and how many of them are Active or Inactive. Below that, you control the list using the filter bar:
- Type in the search field to search by name, email, phone, or associated company.
- Narrow the list with the All, People, or Companies pills.
- Filter with the Tags button (search and multi-select, for example VIP and Supplier; a contact matches if it has any of the selected tags) or by Active and Inactive.
- Use the Business relationship button to show only Customer, Supplier or Partner / service provider contacts; several selected roles apply together (a contact matches if it has at least one of them).
- Use the Custom fields button to filter by your own contact fields: pick a field, then select values, yes/no, a search term or a from–to range depending on its type. Several fields apply together. Active filters appear as chips below the bar and can be removed one by one.
- Use the A–Z index on the right edge to jump straight to a starting letter.
The letter in the A–Z index always follows the name shown in the list: the company name for companies, the first name for people. To look someone up by last name, use the search field instead — it also searches last name, email address and phone number.
The list is sorted by Last contacted by default, so the most recent contacts appear at the top.
The create and edit form is split into sections: Master data (type, salutation, business relationship), Contact, Internal assignment (account manager, tags), Billing (customer number, debtor and creditor number, default discount, invoice email, payment terms), Purchasing (creditor number, order email), Address, Tax & invoicing (collapsed; opens by itself if it already contains data) and Custom fields.
The Billing and Purchasing sections follow the business relationship (see below): a pure supplier sees only Purchasing, a pure customer only Billing — otherwise both sections are shown.
Creating a new person or company
Click Create contact in the top right. A dialog opens with the contact form.
- Under Type, choose between Person and Company.
- For a person, fill in Salutation, Title, First name, and Last name, and use Associated company to assign an existing company.
- For a company, enter the Company name and, if needed, add Website, VAT ID, Tax number, and the Managing directors.
- Enter contact details such as Email, Phone, and Mobile, and capture the Address via the address field. The Additional info field right below it holds the address addition — this is where you put an "attn." line such as
attn. Mr Mayer. It appears in the recipient block on quotes and invoices as soon as your template contains the{Address_Line_4}placeholder (see "How do I create layouts for financial documents?"). - Assign the relevant keywords in the Tags field (see below).
- Click Create contact to save.
The Customer number is assigned automatically when you create the contact, so you don't have to set it yourself.
Duplicate warning when creating
As soon as you click Create contact, the system checks whether the contact already exists — by name, phone number and company. It also finds single typos in longer names, a different word order, additions such as "Ltd", or phone numbers formatted differently.
If it finds a similar contact, a note appears in the window with up to three suggestions. Each suggestion states why it matches — for example "same name", "same phone number" or "same company". You decide:
- Open existing — you land directly on the detail page of the contact that was found. Nothing new is created.
- Create anyway — your contact is saved exactly as entered.
In forms where something else is already in progress — creating a company, recording an inquiry, creating a contact from an email — the first button reads Use this contact: it takes over the existing entry directly into the form you are working in, so you neither leave the page nor lose what you have entered so far.
The company on its own does not raise a suggestion for a person: there, the name or the phone number has to match as well. Otherwise every person at a large customer would be flagged. For companies, the company name itself counts.
The note blocks nothing: it is a reminder, not a lock — with Create anyway you can always continue. It also appears when you record an inquiry by phone and create a new contact along the way. The check only applies when creating; it does not appear when editing an existing contact. If you keep typing while the note is open, it disappears — otherwise the suggestions would refer to values that are no longer in the form.
Sorting contacts with tags
Tags are free-form keywords such as VIP, Supplier, or Wedding that let you group your contacts and filter the list by them later. They work the same way for people and for companies.
- Open the Tags field in the contact form — both when creating a contact and when you Edit an existing one.
- Type a keyword and confirm with Enter or a comma. The arrow on the right of the field shows every tag that already exists in your workspace so you can pick one.
- A tag that doesn't exist yet is created automatically when you save and is available everywhere afterwards.
- To remove a tag, click the ✕ on it.
- Save the contact — the tags are only applied at that point.
The assigned tags then appear at the top of the contact card, and you can filter the contact list by them. Capitalisation doesn't matter: Wedding and wedding are the same tag.
Business relationship: customer, supplier, partner
The business relationship says what a contact is to you — unlike the type, which is only Person or Company. You'll find it in the contact form's Master data section:
- When creating or editing a contact, pick one or more roles under Business relationship: Customer, Supplier and Partner / service provider.
- A contact can hold several roles at once — a business you buy from that also books you for its own event is both customer and supplier.
- Save the contact.
Without a role nothing changes; Partner / service provider is the right role for collaborations that are neither customer nor supplier.
In the contact list you filter by these roles with the Business relationship button. Several selected roles apply together: the list shows every contact that has at least one of them. Active roles appear as chips below the filter bar and can be removed there one by one.
Invoice email, order email and payment terms
Three details on a contact steer your documents. All three are optional — leave one empty and the previous behaviour applies.
- Invoice email (Billing section): the address invoices, payment reminders and dunning reminders go to. Useful when your customer's accounts department has its own address. For invoices and credit notes it is preselected in the recipient field, and dunning, auto-invoices and automatically sent documents use it too. For dunning reminders, the recipient can only be an address stored on the contact. Empty = the contact's main email address.
- Order email (Purchasing section): the address orders to this supplier go to. Once set, the order goes to that address only; when empty, every address on file is used, without duplicates.
- Payment terms in days (Billing section): 1 to 365 days. New documents use these terms; without an entry the workspace default applies.
Excluding individual contacts from emails
Sometimes a contact should no longer receive anything — a person kept on file only for their accounts department, for example, or someone who has asked you to stop. Don't delete the email address: turn the emails off instead, and the contact stays in the CRM with their full history while receiving nothing.
Turning it off: Open the contact and set the switch No customer emails to this contact in the header. It saves straight away. The contact header then shows Customer emails switched off, so you can see at a glance that no customer emails go out to them. Turn the switch off again and they receive them again.
What no longer goes out: Invoices, cancellations, quotes, payment reminders, dunning reminders and contract and schedule emails. This also applies to documents you send yourself from Univents. A dunning reminder you then download as a PDF and deliver another way (in dunning: Mark as delivered manually).
What still goes out: Invitations, access and sharing emails — such as the customer portal invite —, confirmations from the booking form, emails from automations and tickets from ticket sales. The contact needs these to get to their documents and their tickets, so the switch leaves them alone.
⚠️ Important: The switch applies to this one contact only. Companies, primary contacts and other contacts on the same event still receive their emails. If a contact has unsubscribed from individual messages themselves, the switch tells you beforehand: those unsubscribes stay in place even if you switch the toggle off again.
A company's primary contact
A company can define who speaks for it. That is the primary contact — they appear in the salutation on quotes, invoices and delivery notes, and they are the preselected recipient when you send to the company. The company name, email address and VAT ID stay the company's; this is only about which person is addressed.
Setting it: Open the company in the contact form or in the master data and pick a person under Primary contact. Only people linked to this company are offered — through Associated company or a link on the Relationship tab. You can switch them there at any time.
On the Relationship tab: the marked row carries the Primary contact label and a Remove primary contact button, while every other person has Set as primary contact. Removing asks for confirmation in a dialog; the person's link to the company stays in place.
⚠️ Important: a primary contact can only be stored on a company, and only for a person of that company. If you pick a person from another company, or a company as the target, the change is rejected with a message and nothing is saved. This is independent of the existing Primary marker on the Relationship tab: Primary describes a person's main employer, Primary contact the person to address at a company.
Tags and custom fields on the inquiry, event, and invoice
A contact's tags and custom fields aren't limited to the contact page anymore — they show up automatically wherever you work with the contact:
- Inquiry inbox and kanban: Next to the name, or under the card title, you'll see the inquiry's tags as chips (up to three, with the rest shown as "+N").
- Inquiry detail, event overview, and the invoice's "Bill to" section: The customer card shows the contact's tags below the name and contact details, along with its filled-in custom fields (label and value). If the contact is linked to a company, a separate row below shows that company's tags and fields.
- New event dialog: As soon as you pick a contact, the same notes appear underneath.
Empty fields are hidden, so you only see what's actually filled in. For longer text or many fields, click show more to expand the rest. Tags containing "VIP" in the name (for example Super VIP) get the same color highlight as the VIP tag.
Creating custom fields: In the header of the contact list, Custom fields opens the Manage custom fields dialog. There you create a field with a Name and a Field type — plus the answer options for choice fields — and confirm with “Create field”. The button now reads that instead of carrying the same text as the heading above it, so the two are easy to tell apart. The field type cannot be changed after creating it. Every field you created has its own Edit button with a visible label and a bin icon to delete it.
⚠️ Important: Tags and custom fields are visible to everyone with access to management who can see the relevant inquiry, event, or invoice — not just to you. Don't put ratings or notes in a custom field that shouldn't be readable by the whole team.
Importing contacts via CSV
If you already have a contact list, you can read it in all at once instead of creating each entry by hand.
- Click Import to open the Import contacts dialog.
- Drag your CSV file into the field or click Select CSV file.
- In the Map columns step, assign the matching field to each column: First name, Last name, Email, Phone, or Company. Leave any columns you don't need set to — Ignore —.
- Click Preview to check the first few rows.
- Confirm with Import.
Univents automatically detects both comma- and semicolon-separated files and already suggests the mapping for common column names.
Using the detail view and the CRM
Click a row in the list to open the detail view. In the header, you'll see key figures such as Events, Revenue, Avg. order, and Last contact. Using the tabs below, you can reach the contact's full history:
- Overview: cards for events, requests, finance documents, tasks, and the Master data.
- Events and Requests: all events and requests the contact is involved in.
- Finances: the associated Quotes, Invoices, and Delivery notes.
- Emails and Calls: the communication history; use Log call to record phone calls. Besides the emails from your mailbox, Emails also lists every automatic email that went to one of the contact's addresses (main, additional, billing, or orders address) — such as the acknowledgement, a quote, or an invoice. A label shows the occasion, and a link takes you to the related event. You see these emails even without a connected mailbox. In the contact list, a small envelope with a date shows when the last email went to the contact.
- Notes and Tasks: manual notes and open to-dos.
- Files: documents about the contact – tenders, contracts, quotes, saved emails (see below).
- Relationship: linked people and companies.
In the top right, you'll also find the actions Add request, Send email, and More actions.
Storing files on a contact
In the Files tab you store documents right on the customer, supplier or partner – for example a tender, a signed contract, a quote as a PDF or a saved email.
- Open the contact and switch to the Files tab.
- Drag one or more files onto the area or click Choose files. Any file type works – PDF, Word, Excel, images and emails as .eml or .msg – up to 50 MB per file. Larger files are skipped with a notice.
- While uploading, the area counts along (“2 of 5”). Afterwards each file appears in the list below.
The list shows each file’s name, size, date and who uploaded it, newest first. Click the name or Open to view the file in a new tab; Download saves it under its original name. Use the bin to delete a file: you confirm in a dialog, and then it is gone for good.
⚠️ Important: Files on a contact are visible only to the owner and admins of your workspace – the crew in the staff portal and your customers in the customer portal do not see them. There are no folders, versions or renaming here; to keep a new version, simply upload it as well. Documents for a specific event still go into the event’s Uploads tab.
The AI assistant lists a contact’s files and deletes a file after you confirm. Uploading only works through the tab.
Linking people to companies
To keep your CRM connected, you assign contact persons to their company. There are two ways to do this:
Quick path when creating or editing: Open the person, click Edit (or create a new one), and use the Associated company field to search for and select the matching company. Save with Save. The company then appears as a subtitle of the person.
You don’t need to enter the Debtor number again on such a person: if the field stays empty, the function sheet shows the associated company’s debtor number — the form shows a hint with company and number below the field. If you enter a number on the person, that one applies.
Detailed link in the Relationship tab: Open the person or company and switch to the Relationship tab. Click Link company (on a person) or Link person (on a company). In the dialog, select the counterpart, optionally enter a Position / title (for example "Managing Director"), and use the Set as primary switch to mark it as the primary employer. A person can have several company links, but only one of them can be marked as primary.
Each row in the Relationship tab shows the name of the linked person or company along with its role — either the text you entered under Position / title, or, if left blank, the default Primary employer, Employer, or Employee. Primary links also carry the Primary label. Use the pencil and trash icons to edit or remove a link.
If a company was only entered through the simple Associated company form field, the corresponding row in the Relationship tab shows an Adopt button instead. Clicking it converts the simple link into a full, editable relationship and automatically marks it as the primary employer. The underlying contacts themselves are unaffected — only how the link is stored changes.
Company structure (holding and subsidiaries)
If a company belongs to a larger group, you can model that as a company structure: a company gets a parent company, and any number of other companies can in turn be its subsidiaries.
Setting a parent company: Open the company, click Edit (or create a new one), and use the Parent company field to search for and select the holding. This field is only available for companies, not for people — there, the equivalent field is still Associated company.
Structure on the Relationship tab: Open the company and switch to the Relationship tab. The Company structure section always sits above the people list. As long as the company has neither a parent company nor subsidiaries, it is a single line reading "no assignment" with the Set and Link subsidiary buttons. Once there is an assignment, the section shows:
- The Parent company row shows the holding's name and path, with Change and Remove buttons. Without a parent company, it reads "No parent company" with a Set button.
- Below that, the Subsidiaries section: an expandable tree of all subordinate companies, across every level. Click a node to see that subsidiary's people (name, position/title, link to the person).
Linking several subsidiaries at once: In the "Subsidiaries" section, click Link subsidiary. In the dialog, use the search to select several companies at once — each selected company appears as a chip. After saving, successfully linked chips disappear; if a single assignment fails (for example because it would create a cycle, or the target no longer exists), that company stays in the dialog as a chip with the reason, while the others are still saved. The footer shows "n of m linked", and a toast summarizes the result.
Removing: Use Remove on the "Parent company" row to detach the company from its holding — after confirming, the company becomes the root of its own structure; its own subsidiaries stay linked to it.
Path in the header and "Part of" in the list: If a company has a parent company, the path line "Part of Holding › Intermediate company" appears under its name in the header — every link in the chain points to that company. You'll see the same "Part of …" note in the contact list under the company name, and on a person's Relationship tab when their company belongs to a holding.
Limits: Very large structures are truncated in the display (depth, number of companies, and number of people per company are capped) — opening the affected company directly shows you the rest. A company can't become its own subsidiary, nor the subsidiary of one of its own subsidiaries (no cycles in the structure) — such an attempt is rejected with an error message and nothing is saved.
What stays the same: Events, requests, and revenue are not summed up across a company structure — a holding still shows only its own events, requests, and finance documents, not those of its subsidiaries. The invoice recipient on a document stays the company of that specific contact, even if it's part of a holding.
⚠️ Important: The company structure is a contact field like any other — everyone with access to management can see and change it, regardless of their role.
Assigning an account manager
On a contact's detail page you use the Account manager card to define who on your team looks after this contact — for example the account manager responsible for this customer. Click the field, pick a person with access to management from the list, and the assignment saves immediately. Use the small cross in the field to remove it again. Only people with access to management can be selected.
Letting the AI assistant edit contacts
The AI assistant can change every field you can change in the form, add or remove tags, maintain additional email addresses and employments, set the account manager and fill in custom field values, with your permissions and without sending any emails. Nothing is deleted until you confirm, and a new main email address is only saved after you confirm the old and the new address on a card. It also lists a contact’s files and deletes a file after you confirm. Examples and limits are in AI assistant: chatting with Univents.
Frequently asked questions
Why can't I change the customer number? The Customer number is assigned automatically when the contact is created and is only shown as a display value in the form. It stays unique and stable.
Which fields do I see for a company compared to a person? As soon as you switch Type to Company, the form shows company-specific fields such as Company name, Website, VAT ID, Tax number, and Managing directors. Fields like First name, Last name, or Associated company only appear for people.
What do "Active" and "Inactive" mean in the list? This label is based on when the contact was last updated or contacted. That way, you can tell at a glance which contacts are currently active and which have been quiet for a while.