

Managing the Inquiry Inbox (Kanban & List)
After reading this article you'll be able to view, sort, filter, and search incoming booking inquiries using the split-panel inbox, the Kanban board, or the list view, and assign an assignee.
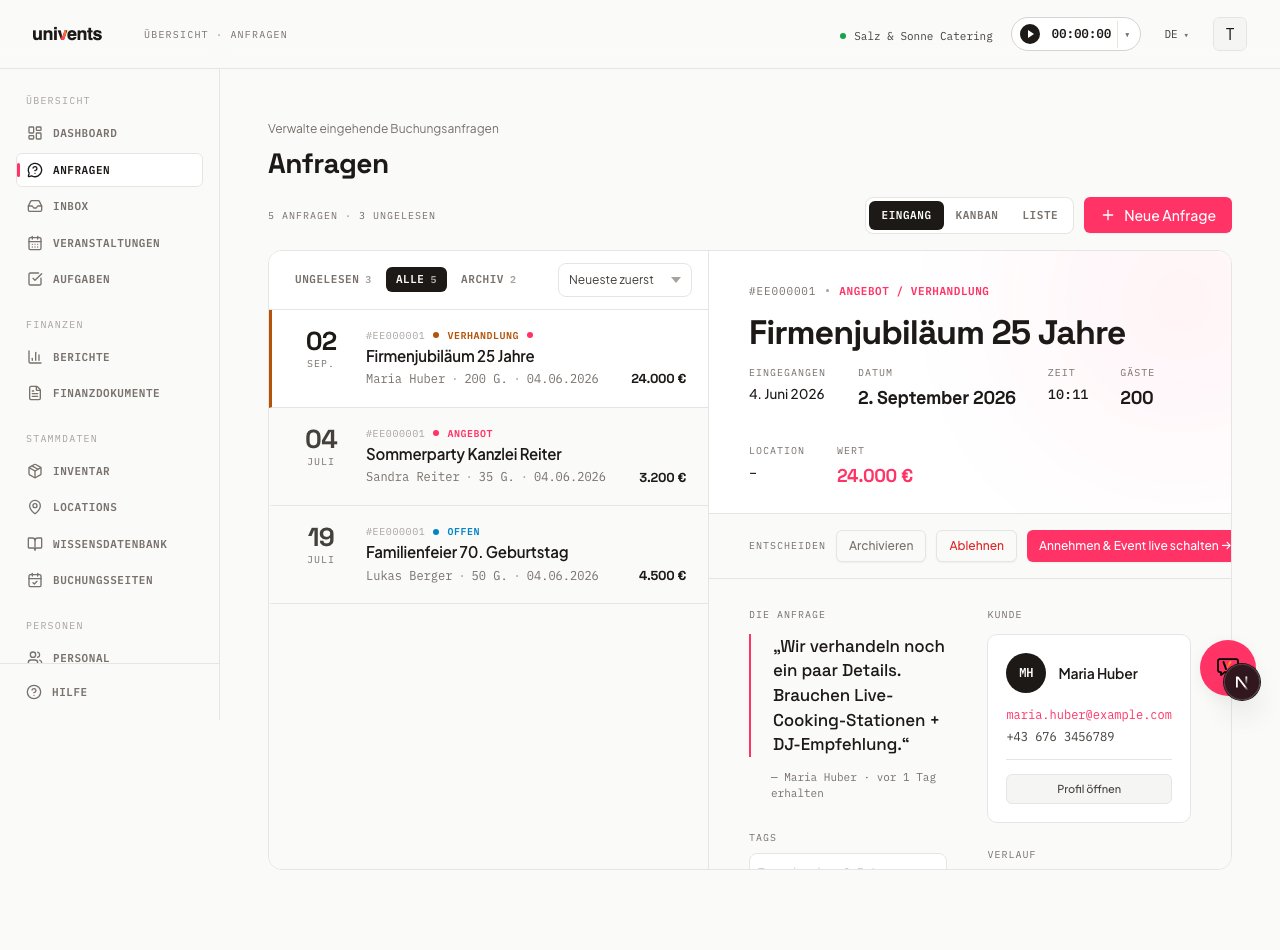
The Inquiries section in Univents gives you a full overview of all incoming booking inquiries at a glance. You can switch between three views and open any inquiry directly from the overview.
The video shows where a new inquiry lands, how you assign it and how an accepted inquiry becomes an event.
You’ll find the individual steps written out below as well.
Switching views
In the top-right corner you'll find the view selector with three tabs: Inbox, Kanban, and List. Next to it is the New Inquiry button for manual entry.
- Inbox is the default view the very first time you open the page. The left side shows a sortable inquiry list; the right side immediately displays the detail view of the selected inquiry (split panel).
- Kanban displays all inquiries as cards, organized by the stages of your inquiry workflow. Cards can be moved between columns by drag and drop.
- List provides a compact table view with a search bar and status filter.
Univents remembers the view and the sorting you last used: the next time you open the inquiries you land exactly where you left off. This is stored per browser — on another device you start in the Inbox again. If you open a shared link that specifies a view, the link wins.
Inbox: segments and sorting
In the Inbox you'll see three segments on the left: Unread, All, and Archive. Each tab shows a count of the inquiries it contains.
- Unread contains all inquiries you haven't opened yet. As soon as you click an inquiry, it automatically moves out of the Unread tab.
- All shows every active, non-archived inquiry.
- Archive contains accepted and rejected inquiries.
Next to the segments is a sort dropdown. Your options are: Newest first, Oldest first, Date: soonest, Date: latest, and Value descending.
Above the segments sits a search box (Inquiry, customer, location …). It matches on event name, contact name, location, company, email, message text and the tags of the linked event — across every inquiry in the workspace, not just the ones currently loaded.
The event's tags appear on the inquiry. If the linked event has tags, they show up as chips on every inquiry — in the Inbox, on the Kanban card, in the List and in the Calendar view. So you can already see from the overview which series, which location or which customer the inquiry belongs to, without opening it. The tag filter of the overview covers both: tags of the inquiry and tags of its event — an inquiry with the event's tag therefore also shows up when the inquiry itself carries no tag. The term stays with you when you switch to Kanban, List or Calendar. When the search finds nothing, the inbox says so explicitly.
In the detail panel on the right, the Customer card shows the customer's address — including when it is stored on the linked company rather than on the person. This applies in every view, so it is there too when you open an inquiry from Kanban or List. If the customer entered a deviating billing address while booking, a coloured notice with that address appears in addition.
Kanban: columns and drag and drop
In Kanban, each column represents a stage from your inquiry workflow. Each card shows the event name, contact name, guest count, location, the event's tags, and estimated value. A colored dot on a card indicates an unread inquiry; a badge shows how many days the inquiry has been open (visible only for overdue inquiries).
- Click a card to open the detail view.
- Press and hold a card briefly, then drag it to another column to change its status. The card snaps into the new column immediately; Univents saves the change automatically in the background. Dragging a card into the Accepted column opens the pre-filled event form first — only your Save accepts the enquiry, takes the event live and, depending on your workspace settings, creates a quote and/or delivery note. If you cancel, the card stays where it was. See Accept, reject, or convert an enquiry into an event. Dragging a card into the Rejected column also asks first: in the dialog you optionally enter a reason and decide whether the customer gets a rejection email.
- Columns can be collapsed using the double-chevron icon in the top-right corner of the column header. This is useful when you have many stages and need to save space. Clicking the collapsed column expands it again.
List: searching and filtering
In the List view, a filter bar appears at the top. From left to right:
- Type a term into the search field (Inquiry, Customer, Location …). Results are filtered by event name, contact name, location, company, email address, message text, and the tags of the linked event.
- Use the All Locations dropdown to select a specific location and show only inquiries for that location.
- Enable the Unread only toggle to restrict the view to inquiries you haven't opened yet.
- Use the sort selector on the right to choose your preferred order.
Below the filter bar, status tabs appear: All, Open, Quote / Negotiation, Accepted, and Rejected, each with a count. Clicking a tab filters the list to that status.
Assigning an inquiry to someone
Every inquiry can have exactly one internal assignee — a person from your workspace responsible for it. That way the team can see at a glance who's handling it, without having to open the inquiry first.
- Open the inquiry in the Inbox (detail panel) or in the detail view.
- Click the Assignee field — it shows Unassigned when nobody is set.
- In the popover, use the search field to pick a person with access to management. The assignment shows up immediately, no page reload needed.
- To remove it, click the assignee again and choose Clear assignment.
The assigned person shows up as an avatar or initials in every view — right in the row in the Inbox, on the card in Kanban, and as its own column in the List. In the filter bar of Kanban, List, and Calendar you can also pick a specific assignee or Unassigned to see only matching inquiries.
When you accept an inquiry, the assignee automatically carries over to the resulting event's project planner — but only if the event doesn't have a project planner yet, or already has the same person set. A different project planner set manually on the event is never overwritten. Assigning an inquiry to someone else automatically sends them an in-app notification and an email — assigning it to yourself or clearing an assignment sends nothing.
When someone is entered as the project planner of an event — whether when creating it, in the event itself, or automatically when an inquiry is accepted — that person receives a notification in Univents and a push on their phone. If you enter yourself or clear the field, nobody is notified.
If your customer inquired through a booking page, you see the chosen package in the inquiry detail. On the event overview, the Booking request card also shows the package and the answered questions from the booking page.
Hiding past events
The longer you work with Univents, the more inquiries pile up — and inquiries for events that ran long ago would otherwise sit right next to the current ones forever. Top left, right next to the inquiry count, you'll find the Hide … past switch. The number tells you how many inquiries are currently affected.
- One click hides every inquiry whose event is more than 30 days in the past — in Inbox, Kanban and List. The Calendar still shows everything; it is deliberately the historical view.
- While the filter is on, the switch turns into Show … past: that brings the hidden inquiries back on screen for the moment, without changing the setting.
- The gear next to it sets a different number of days — or turns the filter off again with Turn off.
- As soon as you search, past inquiries are included. That way you can still find an inquiry by name even when its event is long over. The switch stays usable throughout: click it once to keep past inquiries hidden while searching.
- The other filters — status, location, tags, unread — do not change whether past inquiries are visible. So clicking Open still shows only your current open inquiries, not the ones from old events on top.
The setting applies to the whole workspace, not just to you. Nothing is deleted or archived: the inquiries stay fully intact and remain reachable via the calendar, the search and the Archive segment.
Frequently asked questions
Why doesn't an inquiry appear in the "Unread" tab even though it's new? As soon as you click an inquiry for the first time, Univents marks it as read. On your next visit it will no longer appear in the Unread segment.
What happens to archived inquiries? Archived inquiries appear in the Archive segment and are not shown under All or Unread. You can bring back a manually archived inquiry, or an already accepted one, at any time using the Reactivate button — for an accepted inquiry, Reactivate asks for confirmation first and then also undoes the decision (status → Open); its event stays in place and remains active, and the customer receives no email. A declined inquiry cannot be reactivated: because declining it also cancelled its event, Univents offers neither Reactivate nor Archive for it. Details in Accept, reject, or convert an enquiry into an event.
Can I filter inquiries by multiple locations? Currently the location dropdown filters to exactly one location. To work without any restriction, select All Locations.
The Kanban shows no columns — what should I do? Kanban requires an active inquiry workflow. Create a workflow under Settings → Status columns to activate the Kanban columns.
Saving your own views
Once view, sorting and filters match how you usually work, save that combination under Views in the header as a named view — for example "Open inquiries by date". The star next to a view makes it your default: the next time you open Inquiries it is applied straight away.
A shared link with its own parameters still wins over the default. The marking is per browser — on a second device you set it again.