

How do I connect my email inbox?
After reading this article you will be able to connect a Gmail, Outlook, or IMAP inbox to Univents, configure visibility and sync period, and work with incoming emails directly in the inbox area.
Connect your email inbox to Univents so that incoming messages are visible directly in your workspace and you can link emails to enquiries, events, and contacts. Gmail, Microsoft Outlook, and IMAP inboxes (e.g. Strato, 1&1) are supported.
In the video you connect a mailbox and then work in the inbox: assign emails, sort them with labels, link them to inquiries and events, and reply with an AI draft.
You’ll find the individual steps written out below as well.
Connect an inbox
- Navigate to Integrations in the main navigation. You land on the All integrations page; click Email & calendar in the CATEGORIES bar on the left, or type "inbox" into the search field at the top, then open the Email inbox card. The ← All integrations link in the top left takes you back to the directory.
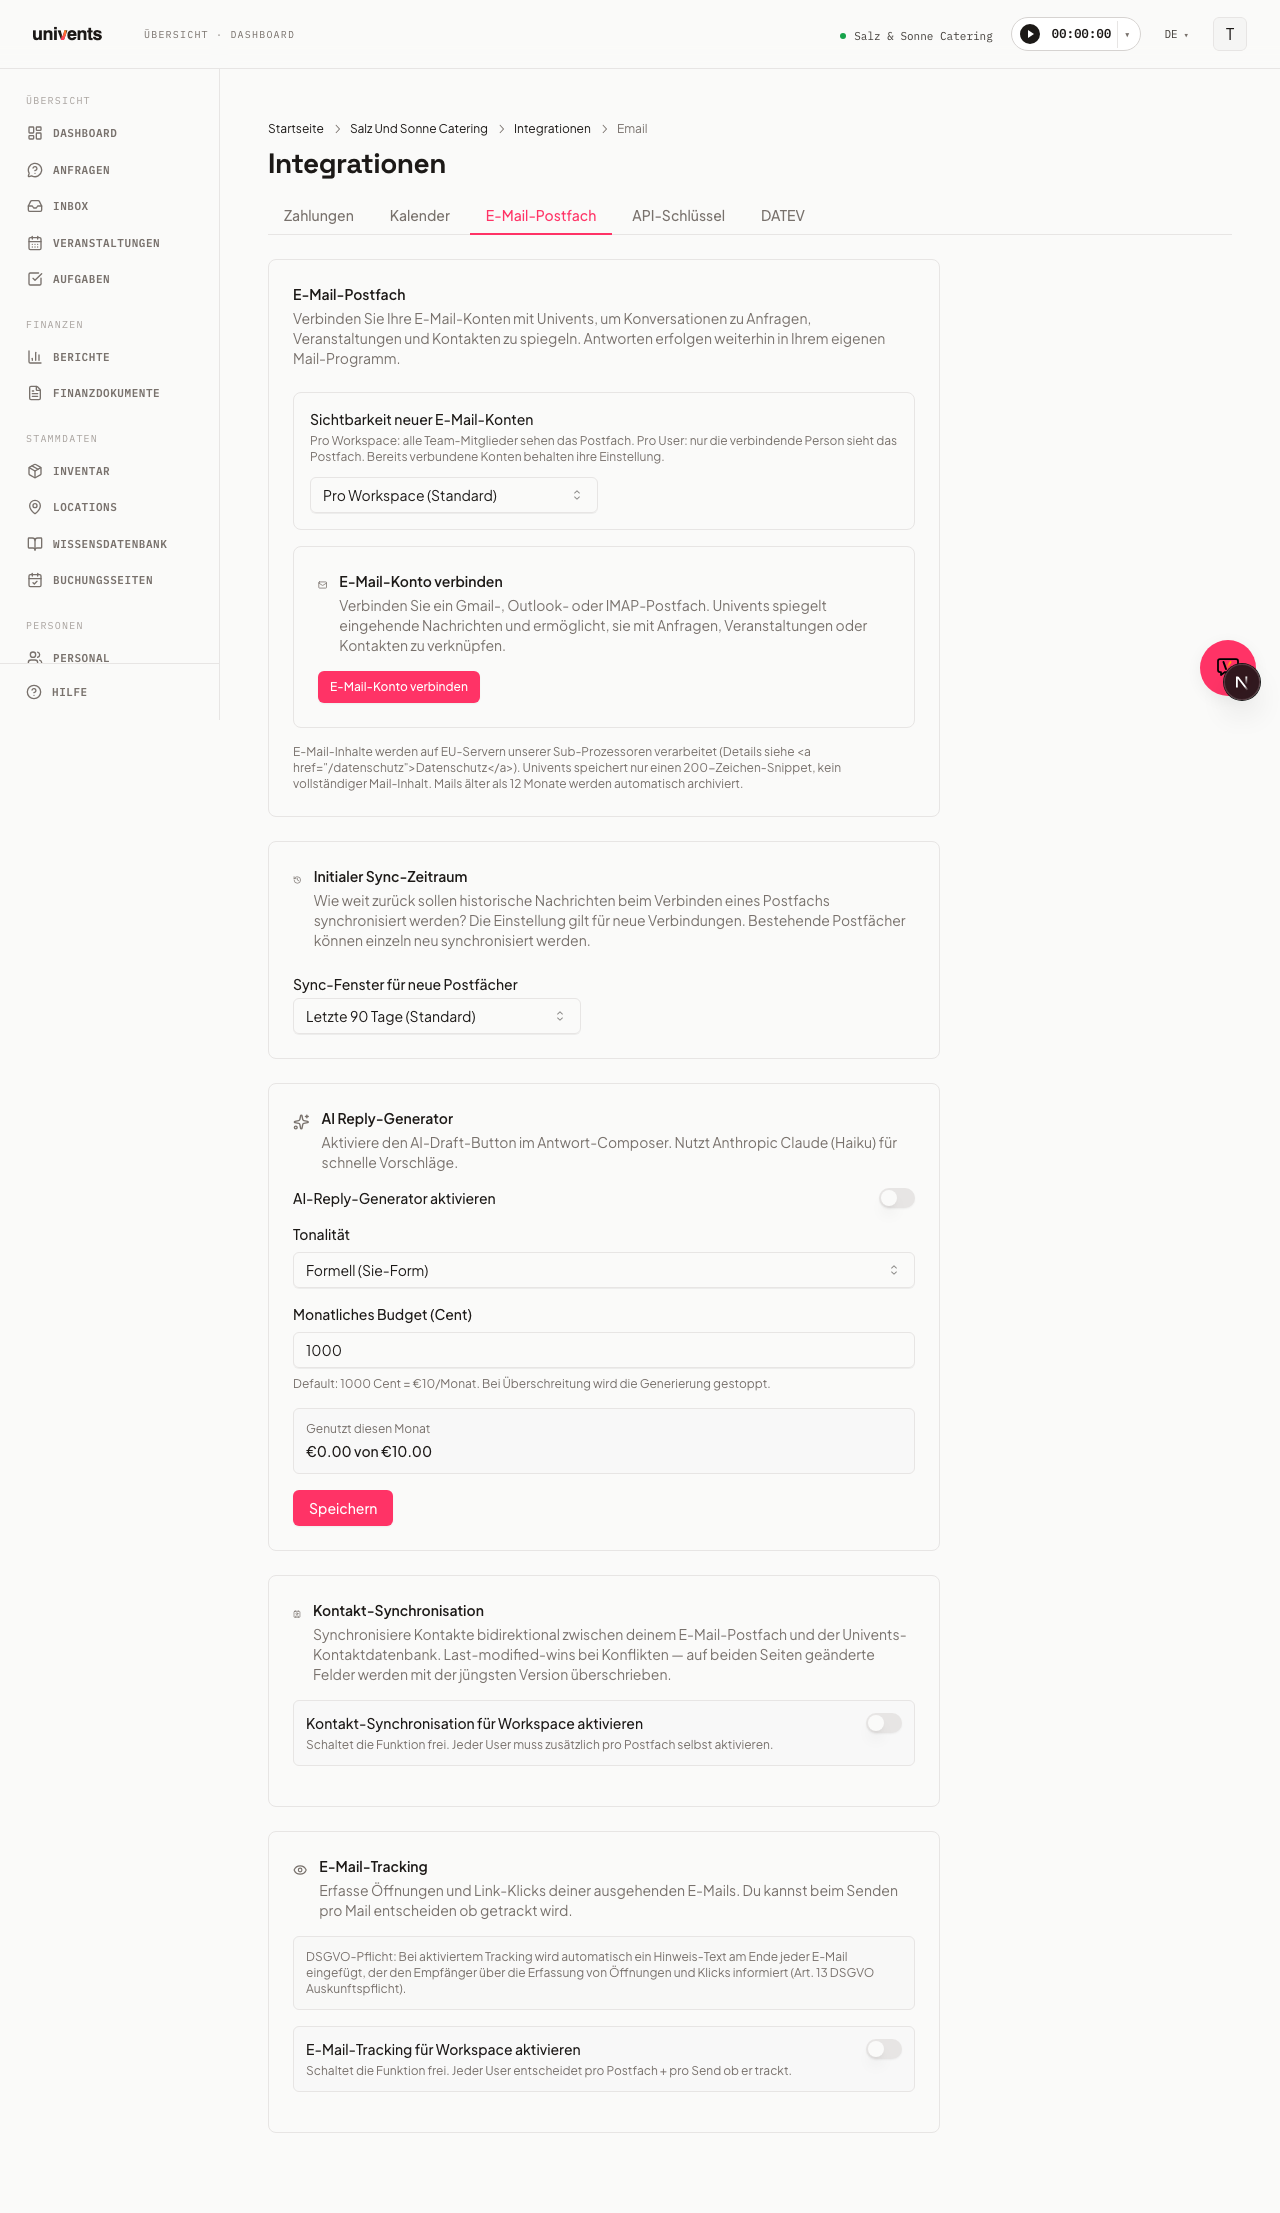
- Under Visibility for new email accounts, choose who can see the inbox: Per Workspace (Default) makes it visible to all admins, Per User makes it visible to you only. You can still share a single email with your team at any time by linking it to an event — see below.
- Click Connect email account.
- You will be redirected to your email provider. Sign in there and confirm the access request.
- Once connected, the account appears in the list with the status Connected.
For IMAP inboxes (e.g. with regional hosting providers) you will need to enter the server address, port, and credentials manually in the provider dialog. You can find the exact values in your provider's support documentation.
Set the sync period
When you first connect an inbox, Univents synchronises historical messages going back in time. As a workspace owner you can define how far back this initial sync should reach.
- Scroll to the Initial Sync Period section on the email inbox settings page.
- In the Sync window for new inboxes dropdown, select a period: Last 7 days, Last 30 days, Last 90 days (Default), Last year, or Full history.
- The setting applies to newly connected inboxes. For existing connections, use the Re-sync button next to the relevant email address to trigger a fresh sync.
The first sync can take up to 24 hours before all historical messages are fully loaded. New incoming emails appear immediately regardless of this.
Using the inbox
After connecting, you can find your emails via the inbox section in the main navigation. The view shows all threads from connected accounts in a single combined list. The Email inbox card under Integrations remains the place for the settings — connecting, disconnecting, visibility, and the sync window.
- Inbox, Snoozed, Archived, and Customers are the four view modes at the top of the inbox.
- Use the search field and filter chips (Unread, Attachment, Today, Customers, Events open, Enquiries open) to narrow the view.
- Click a thread to open the preview. From there you can create an enquiry, add a contact, or link the thread to an enquiry, event, or contact directly.
- Write replies using the Reply button right inside Univents — the message is sent through your connected inbox.
Contact sync and email tracking
Workspace owners can enable two optional features in the email inbox settings:
Contact sync keeps contacts in sync bidirectionally between the connected inbox and the Univents contact database. On conflicts, last-modified-wins applies: if a field was changed on both sides, the more recent version overwrites the older one. An empty field in your inbox never clears an existing name or address in Univents, and an email address is never taken over as a name. Company contacts stay untouched: Univents only matches a contact from your inbox to a person, never to a company, and never overwrites company details. If a company uses the same email address as a contact from your inbox, that contact is matched to a person with the same address — or, if there is none, Univents creates a new person. First enable the workspace-level toggle Enable contact sync for workspace, after which each user can switch the feature on or off per inbox individually via Sync my inbox. Use the Start full sync button to trigger a one-time full sync of all your existing contacts, instead of only waiting for future changes.
Email tracking records opens and link clicks for outgoing emails. Please note: for GDPR reasons, a disclosure notice is automatically appended to the bottom of the email when tracking is enabled. Enable the workspace-level toggle Enable email tracking for workspace and then decide per inbox whether tracking should be on by default.
AI reply generator
In the AI Reply Generator section (also on the email inbox settings page) you can enable automatic reply drafts. Univents will then suggest a ready-to-send reply in the reply composer when you click Generate draft.
- Turn on Enable AI reply generator.
- Under Tone, choose between Formal, Casual, and Personal (formal, warm).
- Enter a Monthly budget (cents) at which generation should stop, then click Save.
Personal signature
Under Settings › Email templates you set up your personal signature. It is appended to your replies from the inbox; when empty, the workspace signature applies.
You write straight into the field, like in a word processor: bold, italic, underline and links come from the toolbar, no HTML needed. The {{sender_name}} and {{company_name}} buttons insert placeholders that are replaced with your name and the company name when the mail goes out. The preview below always shows the result with sample values.
If you prefer writing your own markup, Edit HTML switches to the source view and Back to editor switches back. Bold, italic, underline, paragraphs and links are allowed — everything else is stripped when sending, so a signature can never become a door for foreign markup.
Frequently asked questions
The connection shows "Connection expired — reconnect". This happens when the provider's access token expires. Click Reconnect next to the affected email address and confirm the access request again.
Will I notice if my mailbox stops working? Yes. As soon as the connection is no longer valid — authorisation expired, access revoked in your provider account, or removed by your IT — you get a notification in Univents and an email with a direct link to this page. Everyone with settings permission gets the same message. Univents also checks every active connection with the provider once an hour, so a revoked access shows up even when the provider itself reports nothing. If the provider is only briefly unavailable, nothing happens — the connection is only switched off after a clear rejection. After reconnecting it counts as active again straight away and the notice disappears by itself.
I don't see an inbox even though I connected one. Check the visibility setting. If the account is set to Per User, it is only visible to the person who connected it. Workspace owners can adjust the setting under Visibility for new email accounts.
How do I show a colleague an email from my personal inbox? Link it to the event it belongs to: open the email in the inbox, click Link and choose Link to event. It then appears for everyone who may see that event, in the event's Communication tab under Email — with subject, text and attachments. The rest of your inbox stays private, and only you can remove the link again.
Only emails from a certain date onwards are shown. The initial sync is limited to the selected time window. In the Initial Sync Period section, click Re-sync and select a longer period if needed, such as Full history.
Can I connect multiple inboxes? Yes — one per person. You can have one shared workspace mailbox, and on top of that every team member connects their own personal mailbox. All connected accounts appear together in the inbox. To use a different address, disconnect the existing one first — the Connect email account button then reappears.
What happens to my mailbox when my trial or subscription ends? The connected mailbox is part of your plan. After your trial or subscription ends, it stays connected for another 30 days. After that, Univents disconnects it automatically — exactly as if you had clicked Disconnect yourself: the emails mirrored into Univents and their links to contacts are removed, the emails in your mailbox itself are not touched. As long as a subscription is running, even if a payment is currently pending, nothing happens. If you later subscribe to a plan with the mailbox feature, simply connect the mailbox again under Integrations.