

Time Tracking & Leave Management
After reading this you'll be able to log and approve staff working hours, approve or decline leave requests, and download a monthly payroll export.
The Staff area brings together everything related to working hours and absences: team members submit their times, you review, correct, and approve them in management — and at the end of the month you export the data directly for payroll processing.
The first video shows how to create wage items with an hourly rate, define night, weekend and holiday surcharges as pricing rules and pull the payroll export including surcharges.
The second video shows how a vacation request is submitted and approved, and how Univents looks for cover for the affected shifts.
You’ll find the individual steps written out below as well.
Viewing and exporting time entries
Open Staff in the main menu and select the Time Tracking tab. The table shows all recorded entries with date, start, end, break, net working time, supplements (weekend, public holiday, night) and current status.
To save the list as a file:
- Click Export CSV in the top right — the file
zeiterfassung.csvdownloads immediately. - For payroll, use the payroll export on the Pay tab: click Export CSV for the current month, or Export several to pick specific months and click Download. The CSV file contains all approved working hours including supplements. Approved, paid vacation days are additionally included as their own row per working day (marked "Urlaub" in the Info column) — the file can go straight to your tax office or payroll system without adding vacation separately.
The time export is included from the Core plan and lists clock-in and clock-out, breaks and premium flags without any amounts. The payroll export on the Pay tab, with hourly rates, gross pay and automatically calculated premiums, is included from Growth.
Both export buttons are only visible if your role has the administration right Export data. Without it they are hidden and a direct call is refused.
Approving or declining time entries
Submitted times appear in the Time Approvals tab. At the top you can see how many entries are still pending.
- Find the relevant entry in the Pending Time Approvals table.
- Click Approve to approve the entry — the status changes to Confirmed.
- Click Reject, optionally enter a reason in the input field, and confirm with Confirm — the status changes to Rejected.
Already-decided entries appear below in the Recently decided section.
Recording and correcting times in the staff file
Sometimes you need to add a time yourself in management or correct an existing one — for example for people without a login of their own. You can do this right in the staff file:
- Open the staff member under Staff → Members and switch to the Time tracking tab.
- Add a new time: Click Add time, enter the date, Start, End and an optional break, and click Save. For a shift that runs past midnight, simply pick the next day for the end. Alternatively, click Start timer to run a live timer and stop it later with Stop timer.
- Correct a time: Click the pencil icon on a completed entry, adjust the start, end or break, and save.
- Delete a time: Click the trash icon and confirm.
An already confirmed entry returns to Pending when edited and must be reconfirmed in the Time Approvals tab — so an approved figure can never change unnoticed. You need the right to create staff times to record one, and the matching edit right to change or delete one.
Checking the time balance
Directly below the time tracking table (in the Time Tracking tab), the Time Balance section shows a monthly breakdown per team member:
- Target — contracted hours scaled to the working days of the month
- Actual — sum of all approved net hours
- Balance — difference: positive (green) or negative (red)
Approved leave does not count as missing time. Every approved vacation day that falls on a working day is taken out of the target — a vacation day is balanced and never creates a deficit. Example: 35 hours a week is 7 hours a day; two weeks of leave in August lower the target by 70 hours. Leave on a weekend or a public holiday changes nothing, because that day is not part of the target anyway. Requested or declined leave does not count. This applies to the monthly value, the Carry-over and the time balance in the employee portal alike.
Public holidays follow the person. Only working days go into the target: weekends and public holidays drop out. Which days are public holidays depends on the person’s holiday region (see Creating & configuring staff) — without an entry of their own, on your workspace’s region. So if someone works in a different state or country, enter the region in their staff file; it then applies to the holiday surcharges in the staff report and the payroll export as well.
Staff members without contracted hours on file will not appear here. Enter weekly hours in their profile under Members in the h / week field so the balance can be calculated.
The Carry-over column sums up every completed previous month. If you are coming from another system this carry-over is empty at first — your existing overtime and deficit hours live somewhere else.
Bringing an opening balance across
Open the staff member under Staff → Members, click Edit and fill in the Opening balance, working-time account field exactly as your previous report shows it:
+64:01for 64 hours and 1 minute of overtime-8:30for eight and a half deficit hours- Decimal hours work too:
4.75is the same as4:45
The value feeds into the Carry-over column, and from the next month on Univents simply carries on. It also applies to people without contracted hours — they have no target hours but still keep the balance they brought along.
The opening balance is a cut-over figure, not a running total. If you later import historical hours as time entries, reset it to zero in the same step or the same hours are counted twice.
Starting a timer from a shift or a task
Instead of opening the stopwatch and setting the link by hand, start tracking where the work is:
- An event's shift plan (Shifts tab): the Start timer button on a shift row books your own time onto that shift and the event.
- Tasks (overview, and an event's task tab): the button starts tracking for exactly that task. If it belongs to an event, the time counts towards that event too.
- Employee portal: the same buttons in the shift list and in Your tasks. For shifts the check-in window still applies (from 60 minutes before the start until the shift ends) — outside it, no button is shown.
Only one timer can run at a time. If one is already running you get a notice instead of a second entry. The task title then appears in your time list underneath the event.
A timer started this way is always stopped from the stopwatch in the top bar — on a computer and on a phone alike.
Tracking your own time on a phone
The stopwatch in the top bar is available on a phone too — for you on the management side, with no detour through the employee portal. It shows the running time, and the button next to it starts and stops it.
Tap the time to open the full surface: Stopwatch with event, shift, notes and break, next to it Manual for a from–to entry with a break, and underneath it the times you tracked today. Whatever you record at your desk, you record the same way on the road.
Picking an event in the stopwatch
If you are inside an event, it is already selected when you open the stopwatch — as a suggestion you can change or clear. A timer that is already running keeps its own event.
When tracking outside an event, you pick it yourself. Both the Event field and the Task and Shift fields have a search box:
- With nothing typed, the next upcoming events come first, followed by the most recent ones. Each name carries its date so events with the same name stay distinguishable.
- Type a name and the whole workspace is searched — including events far in the past or well into the future.
- The choice is optional: without an event the time is recorded unassigned and can be attributed later via Edit.
Pick an event first and the Shift field narrows down to that event's shifts.
Billing tracked time
Approved working hours can be passed straight through to the customer as an invoice line item — useful for projects billed by actual effort instead of a flat fee.
- Set the sale rate on the team member's wage product (the "Sale to customer" field when creating it, later on the product) — this rate is independent of payroll and only determines what's billed to the customer.
- Approve the time entry in the Time Approvals tab as usual, via Approve. If a specific entry shouldn't be billed despite being approved, additionally enable the Not billable checkbox on that row.
- Open a draft invoice on the relevant event and click Adopt positions in the document editor.
- Expand the Tracked time section. Every approved, billable time entry appears here with staff member, period, net hours, and the resulting amount.
- Use the Itemize by staff member toggle to decide whether the invoice line shows names (on) or forms one combined "Labor" line without names (default).
- Select the entries you want and click Add … (… hrs) — Univents automatically creates invoice line items from them.
This path only works on draft invoices (not quotes, delivery notes, or credit notes) and requires the Staff plan add-on. If you delete the resulting line item or void the invoice, the affected time entries automatically become available for adoption again.
Managing leave requests
Switch to the Vacation Requests tab. All requested, approved, and declined absences are listed here.
To add leave manually (for example, when a team member notifies you in person):
- Click Add Vacation.
- In the Employee field, select the relevant person.
- Enter the From and To dates.
- Optional: add a Reason.
- Click Add Vacation — the request is immediately treated as approved.
For submitted requests: use Approve or Reject directly in the row. Approved leave is highlighted in colour on the shift plan so you can spot conflicts at a glance.
Vacation cover (from Core): When approving, Univents shows you the person's shifts that fall into the vacation period, and you can Find replacement for each shift right away — the same replacement search as for a sick call. On a smaller plan a notice appears in its place, from which you can try the feature free for 14 days; the vacation can still be approved.
Editing or deleting leave after the fact
Leave that has already been created, approved or declined can be corrected at any time — both in the list under Staff → Leave and in the staff file's Leave tab:
- Change the period or reason: Click the pencil icon in the row, adjust From, To or the Reason, and click Save. The status (requested, approved, declined) stays unchanged; the team member does not receive a new notification.
- Delete the entry: Click the trash icon and confirm with Delete — for example when a leave was accidentally created twice. Approved days are credited back to the leave balance immediately.
Editing requires the Edit permission in the Staff module, deleting the Delete permission (configurable under Settings → Roles). Without them the icons are not shown.
Configuring break rules
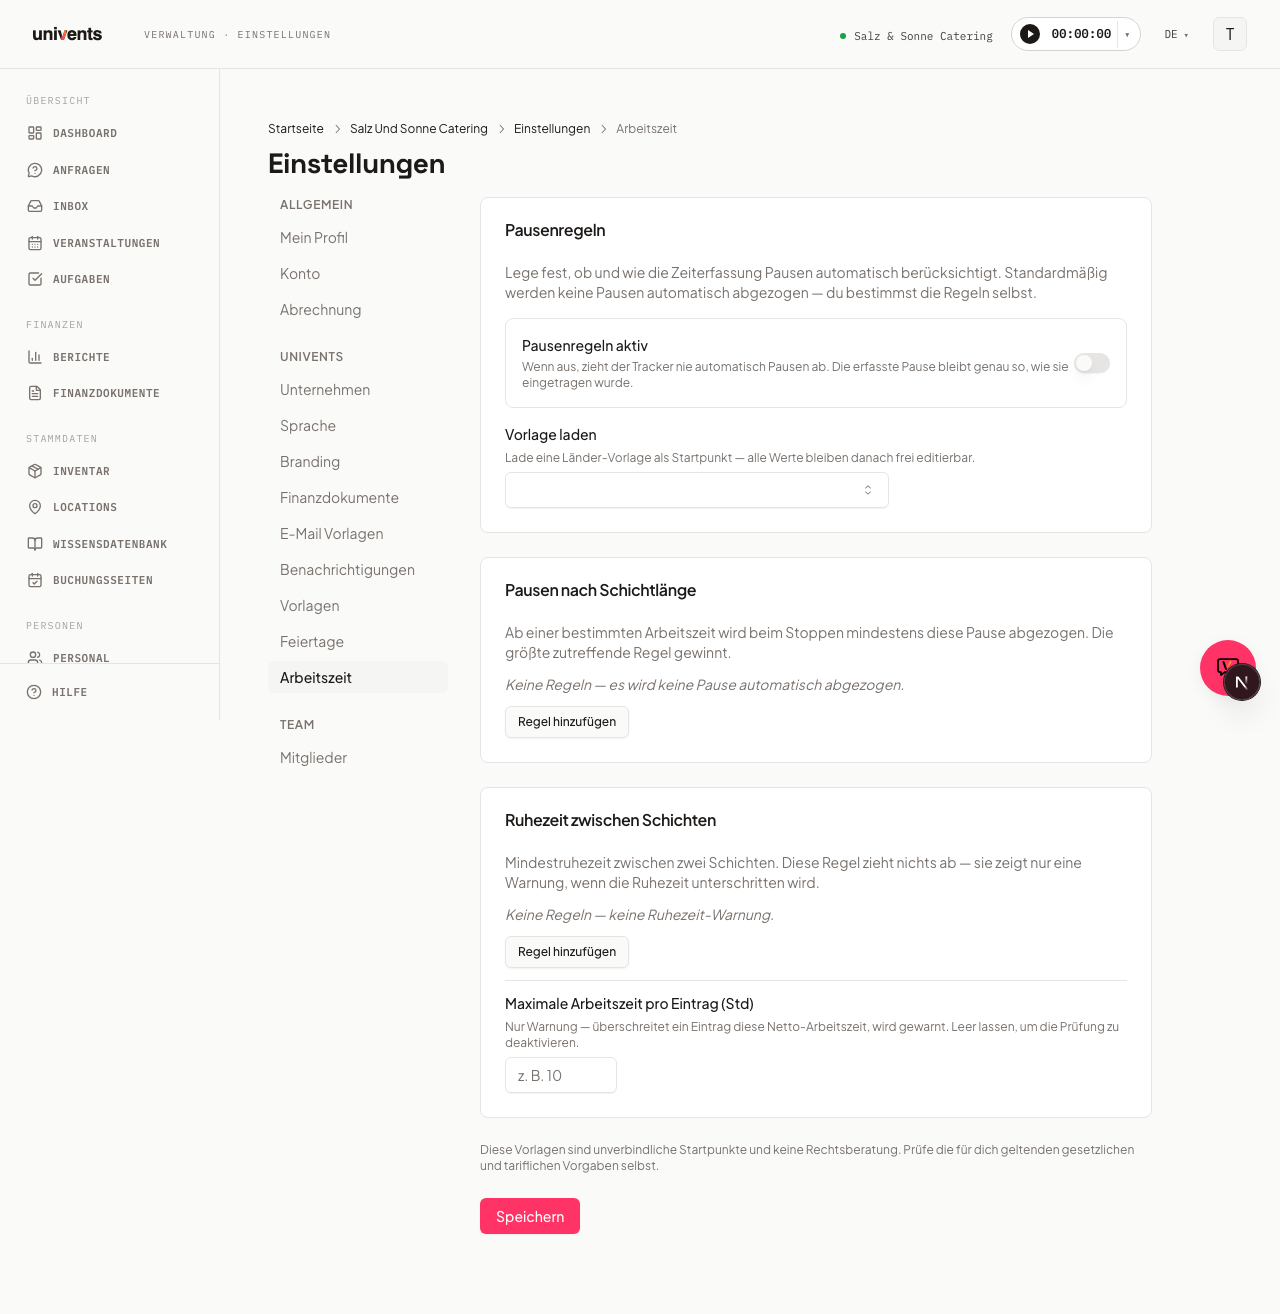
Under Settings > Working time you define whether and how breaks are automatically applied.
- Enable the Break rules active toggle to switch on the automatic logic.
- Optionally load a template via the Load template dropdown (e.g. Germany (ArbZG)) as a starting point — all values remain editable afterwards.
- Under Breaks by shift length you define rules: after how many working hours should at least how much break be deducted? Click Add rule, then enter values in the After worked time (h) and Break (min) fields.
- Under Rest between shifts you can set a minimum rest period — if an entry falls below this threshold, a warning appears.
- Optionally enter a maximum value under Maximum work per entry (h).
- Click Save.
Frequently asked questions
A team member isn't showing up in the time balance. Check whether their profile (in the Members tab) has a value entered in the h / week field. Without contracted hours, no target can be calculated.
Where do I correct a wrong time entry? Time entries are shown in the Time Approvals tab. Entries with the status Submitted can be sent back via Reject; the team member can then correct and resubmit them.
Are approved leave days shown on the shift plan? Yes — in the Shift Plan tab, approved absences are colour-coded so you can immediately spot gaps when planning.
Can I edit a leave entry after the fact? Yes — every leave row (under Staff → Leave or in the staff file's Leave tab) has a pencil icon for changing the period and reason, and a trash icon for deleting it. This also applies to entries that have already been approved or declined.
The break rule template doesn't quite fit. Load a template as a starting point via Load template and then adjust each value manually. The note below the settings is a reminder that templates are not a substitute for legal advice.
Can people without their own login also log time manually, or only with the stopwatch? Both. Manual entry (event, task/shift, start, end, break, notes) is available to crew with their own login as well as to anyone working through a portal link without one — entries from either path land in the Time Approvals tab for review the same way.