

Tasks: create & manage
After reading this you'll be able to create tasks globally and per event, assign people (including yourself in one click), make tasks repeat, organize tasks without an event with tags, use phases, chain tasks that depend on each other, and manage status via Kanban with your own columns or Timeline.
With Tasks you organise everything that needs to get done around your events — from early planning through the event day to follow-up. Tasks can be assigned to individuals, given deadlines and reminders, and tracked at a glance in a workspace-wide overview.
Tip: If a quote is already linked to the event, you don't have to build the task list by hand — the Plan from quote button on the event's detail page can suggest a first task list using AI. The result stays a draft that you review yourself. More on this in Creating an Event via the Wizard.
The video shows how to create tasks with a deadline, phase and person in charge, set checkpoints and reminders and insert tasks from templates.
You’ll find the individual steps written out below as well.
Where to find tasks
There are two entry points:
- Event tasks: Open an event and select the Tasks tab. Here you see only the tasks for that event, split into phases — by default Preparation, During Event, and Follow-up. Which phases exist, what they are called and in which order they appear is up to you under Settings → Status columns → Task phases (see Customising status columns).
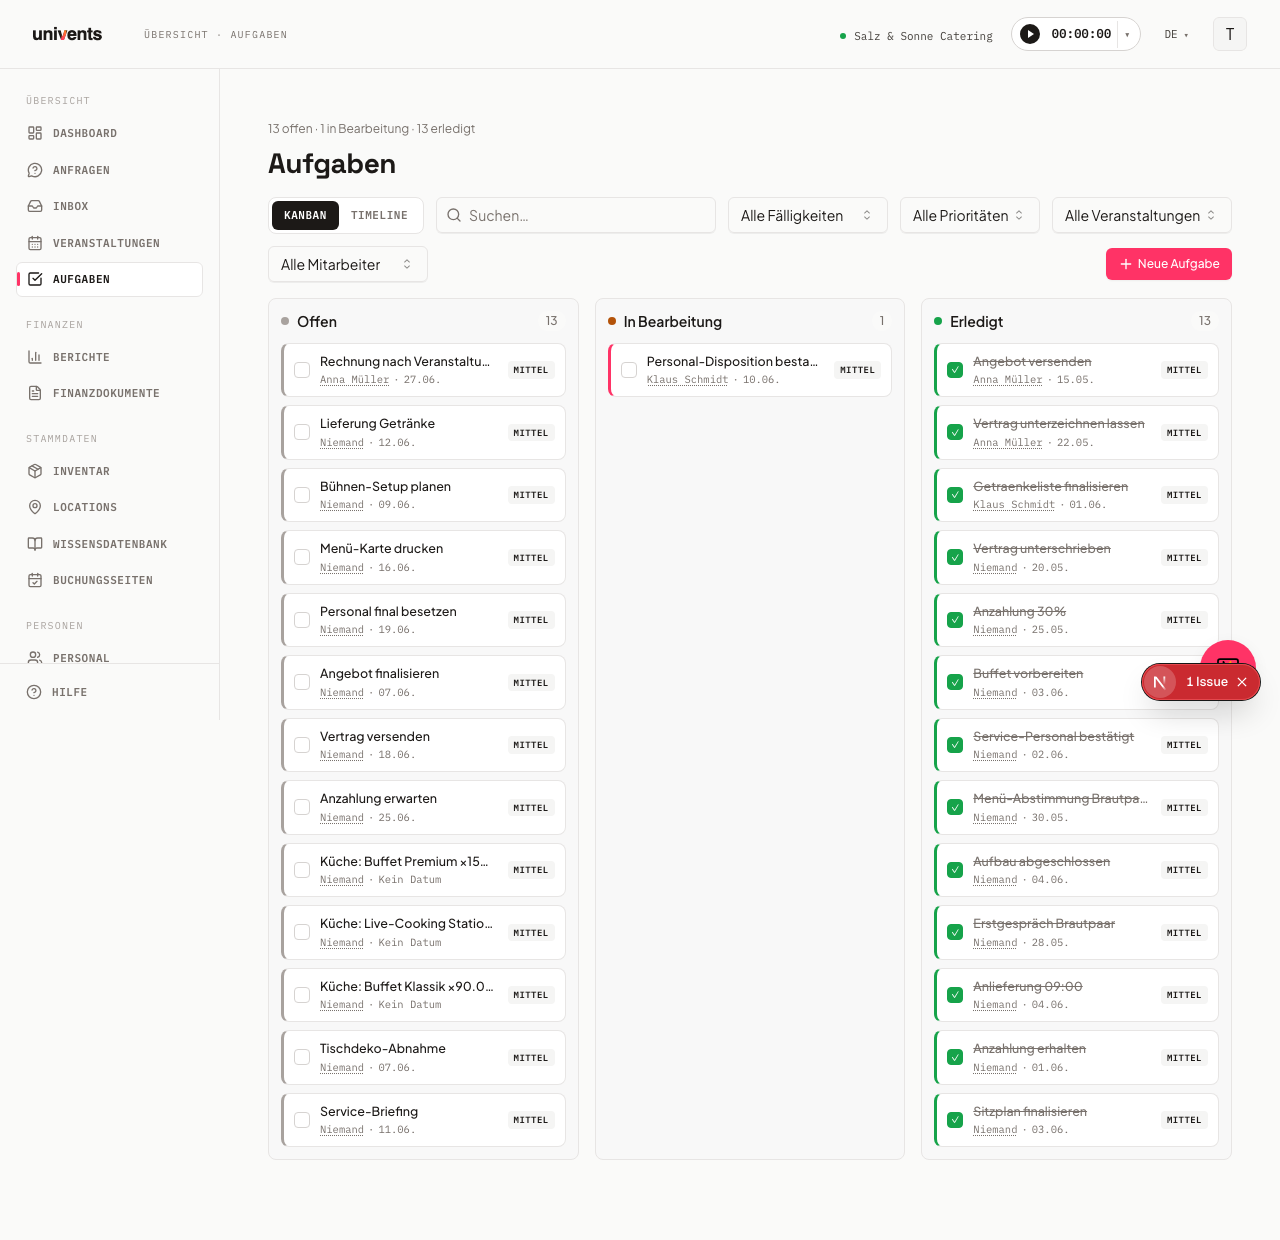
- Workspace overview: Under Tasks in the left menu you see all tasks across your workspace at a glance — spanning every event. The page description shows how many tasks are open, in progress, or done. Each column header shows the total number of tasks in that column; when there are more than fit in one load, the header reads
loaded/totaland load more at the end of the column fetches the next page.
Creating a new task
- Click Task (in the event tab) or New Task (in the workspace overview).
- Enter what needs to be done in the Title field.
- Optionally add a Description.
- Choose a Priority: Low, Medium, or High. Below it, Status sets which Kanban column the task sits in — for example Open or a custom status such as “Waiting for client”. If you leave the field alone, the task starts as open.
- If needed, enter a Start date and a Deadline. Next to the deadline you can optionally set a Time as well. Leave it empty and the task stays due for the day, as before; with a time set, the list, Kanban, and Timeline show date and time, and "Overdue" kicks in at that exact moment instead of at the start of the day.
- If the task comes up regularly, pick how often under Repeat: Daily, Weekdays (Mon to Fri), Weekly, or Monthly. The default is Never. More on this in the Recurring tasks section below.
- Choose a Phase (event-linked tasks only) from your workspace's phases — by default Preparation, During Event, or Follow-up. The phase decides which group the task appears in on the event tab. If no deadline is set, the phase also fills in a matching due date, provided a default due date is configured for it (for the three default phases: 7 days before the event, on the event day, 1 day after).
- Click Create to save the task.
In the workspace overview you can also assign the task directly to an Event, or create it without any event link.
Assigning people
Under Assignees you can select one or more people from your contacts:
- Type a name or email address into the Search person ... field.
- Tick the checkbox next to the person you want. You can select multiple people at once.
- When multiple people are selected, the option Create one task per person appears. Enable it to create a separate task for each person.
- If you have crew groups linked to the event, you can use Assign people from lists to add an entire group at once.
- If the contact doesn't exist yet, click Create person to add a new contact on the spot.
- Want to take the task yourself? Click Assign to me — you're added to the assigned people right away, no searching needed. This works as soon as there is a team entry for you in this workspace (under Staff); if there isn't one, Univents tells you instead of silently doing nothing.
What a task row shows you
Every task row tells you at a glance who is responsible and how urgent it is getting:
- Owners as pictures: Instead of just the name, the profile picture of the responsible person sits in front of the row. If no picture is stored, their initials appear. When several people are responsible, their pictures sit side by side; from the fourth onwards a +N sums up the rest — hover over it to see the remaining names. When nobody is responsible, the spot stays empty.
- Due dates in colour: Tasks past their deadline carry a red Overdue marker together with the date. Anything due today or tomorrow is marked Today or Tomorrow. Everything else shows just the date as before, and completed tasks carry no marker at all. If the task has a time set, "Overdue" kicks in at that exact time — a task due today at 6pm isn't overdue yet at 5pm.
- Status as a chip: In the phases and timeline views a small chip with a colour dot and the status name sits next to the task — so you can see how far along it is even where there are no columns. The Kanban leaves it out, because the column already shows the status.
- Repeat icon: Recurring tasks carry a small circular-arrow icon. Hover over it to see how often the task comes back.
- Waiting on: If the task depends on another one and that one is still open, the row carries a small hint with an hourglass and the predecessor's title — for example Waiting on: approve quote. Hover over it if the title is cut off. On completed tasks the hint disappears.
Profile pictures are maintained in each contact's personnel file — tasks pick them up from there.
Recurring tasks
For things that keep coming up — "log the cold-room temperature", "send the weekly plan to the kitchen", "prepare the month-end close" — you create the task once and choose under Repeat how often it comes back:
- Daily — every day.
- Weekdays (Mon to Fri) — every working day; Friday is followed by Monday.
- Weekly — every seven days, so always on the same weekday.
- Monthly — on the same day of the following month. If that day doesn't exist (say the 31st in February), Univents uses the last day of the month.
How it works: As soon as you complete a recurring task, Univents creates the next one — with the same title, description, assigned people and tags, and on the same event. The new task is open and gets the next date in the series, counted from the previous due date, not from the day you ticked it off: a weekly Monday task stays a Monday task even if you complete it on Wednesday. If you left a task lying for a while, the new one jumps to the first date from today — a daily task that is ten days overdue becomes due today, not overdue again. A time of day carries over. If the task had no deadline, today counts.
Only one next task is ever created: if you accidentally reopen a completed task and tick it off again, no second one appears. Checklist items, files, and dependencies are not carried over — the new task starts fresh.
Stopping the repetition: Open the latest task of the series and set Repeat to Never. From then on, completing it creates no further task.
Task templates don't have repetition — applying a template creates one-off tasks.
Organizing tasks without an event (tags as projects)
Not every task belongs to an event: reworking the website, planning a trade-fair stand, stocktaking. So these tasks don't get lost in one long list, organize them with Tags — one tag per project:
- Open the task (or create it in the workspace overview under Tasks with No event) and pick a matching tag under Tags, for example "Website" or "Trade fair 2027". If it doesn't exist yet, type the name and create it on the spot.
- Filter the overview by that tag at the top and choose Without event for the event filter. Now you see exactly the tasks of that project.
- Save the filter under a name via Views. Next time it's one click; with Set as default the overview opens straight in this view.
Good to know:
- Views are personal. Only the person who saved a view can see it. If your team should use the same view, each person saves it once — the tags themselves apply to the whole workspace.
- No grouping by tag. The overview groups by status (Kanban) or time (Timeline), not by tag. For a project you therefore filter by its tag rather than seeing all projects side by side.
- A task can carry several tags, for example "Trade fair 2027" and "Purchasing".
Making tasks depend on each other
Some tasks can only start once another one is done — the venue has to be confirmed before you print. Instead of keeping that in your head, you chain them together:
- Open the task that should wait and click into the search Feld under Depends on.
- Type a title and pick the task that has to be finished first. You can pick several predecessors — the task counts as waiting until all of them are done. You can still complete it anyway: the dependency is a hint and a tie for the due date, not a Sperre.
- Save. From then on the task row shows Waiting on: … as long as one of the predecessors is still open.
What you cannot pick: the task itself and anything that would create a loop (if A waits on B and B waits on A). Those tasks never even appear in the list; if something does collide when saving, you get a note that the selection would run in a circle instead of a raw error.
The due date moves along automatically: When you move a task's due date, every task that depends on it moves by exactly the same amount — across several levels as well (the task waiting on the moved one, and everything waiting on that one in turn). The time of day stays intact, and a gap you set between two tasks (say, three hours after the predecessor) stays as it is. Completed tasks are no longer dragged along — they stay put. After saving, a note tells you how many downstream tasks were moved along.
Dependencies apply within a single event only: the tasks offered are those of the same event. Tasks without an event cannot be linked. In the customer portal they are never visible — even for a task marked visible to the customer, the customer sees its status at most, never the hint about a predecessor or a downstream task.
Status, phases, and views
Changing status via checkbox: Click the checkbox on the left of a task row to mark the task as done (or reopen it). The status updates immediately.
Progress of the event: At the top of an event's Tasks tab, a bar shows how much is already done — next to it you'll find done/total including a percentage. Hover over the bar to see the split into open, in progress, and done.
Tasks in the event tab: The tab offers three views you can switch between at the top:
- Phases (default view): Tasks are grouped by your workspace's phases — by default Preparation, During Event, and Follow-up. The top-right of each phase shows how many tasks are already done. Without an explicit assignment the group follows the deadline (before the event day, on it, after it) and lands in the matching default phase, even if you have renamed it. You can move a task into another group at any time — either by dragging it onto the phase you want or via the Phase field in the task form. The deadline stays untouched. Custom phases you have added (for example “Invoicing”) only receive tasks this way. An archived phase stays visible as a group marked “archived” for as long as tasks remain in it.
- Kanban: One column per task status of your workspace — by default Open, In progress and Done. You add your own statuses such as “Waiting for client” under Settings → Status columns → Task statuses (see Customising status columns). Tasks can be moved between columns by drag and drop; a column that counts as Done ticks the task off.
- Timeline: A horizontal timeline showing all tasks that have a due date.
Workspace overview: Here the Kanban and Timeline views are available. The Kanban shows the same task statuses as columns as an event's tab. You can also filter by event, staff member, due date, status, and priority, or use the search to find a specific task quickly. Right next to the filters you sort the list by Newest first (default), Due date ascending, Due date descending, or Priority; tasks without a due date always come last. The sort can be combined with any filter and applies on an event's Tasks tab as well. The status filter shows only the columns you pick; on an event's Tasks tab you choose the status right in the filter bar next to the phase. If several of your statuses count as open, in progress or done, the list also offers All open, All in progress or All done at the top, so you can filter across all matching statuses at once. Each kanban card shows the event with its date in a line of its own; if the task's due date falls in the coming year, that line also shows the year. When you filter by event, every entry in the picker carries the date in the same line, for example “Pre-Sale | 02.02.2027”.
Reminders and checklists
Reminders: In the task form you can select predefined times under Send reminders — for example 15 min before, 1 hr before, 1 day before, 3 days before, or 1 week before. Use + Custom to enter any interval in minutes, hours, days, or weeks.
The reminder goes to the person the task is assigned to — to everyone assigned if there is more than one. If nobody is assigned, the workspace owner receives it so the reminder isn't lost.
Tasks with a time are checked hourly — the reminder goes out matching the chosen lead time, including "15 min before" or "1 hr before". Day-only tasks (without a time) are still reminded once each morning, as before.
Checklist: Under Checklist you can add multiple individual steps to a task. Click Add item and enter the text. Each item can be ticked off or reopened independently. Long items wrap in the input field, which grows with them — Shift+Enter adds a new line inside one item. Whether a task has checklists and how far along they are is shown wherever tasks are listed, including the number of items.
Tracking time on a task
There are two ways to book your working time against a task:
- Straight from the row: Click the start icon in the task row. The stopwatch immediately runs on exactly that task. On completed tasks the button is hidden.
- From the top bar: Open the stopwatch at the top. If you are inside an event, you can pick a Task there alongside event and shift before you start. The open tasks of that event are offered. Without an event context the picker does not appear.
If you switch the event in the stopwatch, an already selected task is reset — it belonged to the previous event.
Templates
You can save frequently recurring sets of tasks as a template and reuse them for new events. The two buttons for this live inside a single event, not in the workspace-wide task overview: open the event → Tasks tab. There, at the top, you'll find:
- From template: Select an existing template and apply its tasks with one click. Dates and assignments can be adjusted before applying. If a template task has an hours- or minutes-based offset (for example "3 hours before the event start"), the applied task also gets a time; an offset in whole days stays day-only. If a template task has a checklist, it comes along when you apply it — the ticks are reset. The same templates also reach you through Review tasks right after creating an event, through an event template, through an automation and through the AI assistant.
- Create template: Choose which of the existing event tasks should be saved in the template and give it a name. The checklists and the responsible people of every task you pick come along into the template.
Comments on a task
Open an existing task and you will find a Comments area at the bottom. Expand it to keep questions, progress notes and decisions with the task itself — instead of digging them out of email or chat later.
- Internal only. Comments are visible to your team and nobody else. Customers in the event portal and partners in EventHub never see them — not even when the task is marked Visible to customer.
- Who can comment? Anyone who is allowed to see the task. So people with read-only access to tasks can still reply.
- You edit and delete your own. Every comment shows its author and time. The pencil and bin icons only appear on your own comments. If you correct a comment afterwards it is marked as “edited”, so the history stays trustworthy.
- The people responsible are notified. When you comment on a task, everyone responsible for that task gets a notification in the employee portal — plus a push notification on their phone if they installed the portal as an app. You do not get one yourself.
- Addressing someone directly. In every comment area you can mention a specific person with @ — only they then get a notification. That also works where there is no defined audience (event, document, inquiry, schedule, function sheet): without a mention, nobody is notified in those places. The one exception: when your crew writes on an event in the employee portal, the people in the office who already wrote there or created the event get notified. See Comments & mentions for details.
- Your staff reply from the portal. Anyone the task is assigned to sees the same comments area on their task row in the employee portal and can reply there — with a login just as well as through a portal link without an account. Their reply lands in this thread. See Employee portal: shifts, time tracking & more for details.
The same area exists on the event itself, on the schedule, on quotes, invoices and delivery notes, on inquiries and on function sheets. To see all comments for one event in a single place, open the Communication tab — above the chat you will find a comment box for the event that is already open, and below it a chronological list that shows where each entry was written and takes you there in one click.
Frequently asked questions
Can I create a task without linking it to an event? Yes. In the workspace overview under Tasks, when creating a task you can choose No event in the Event field. The task will then appear only in the overall overview, not in any specific event tab.
Why is there no Phases view in the workspace overview? The Phases view requires an event link in order to calculate due dates relative to the event date. The workspace-wide overview therefore only offers Kanban and Timeline.
What does "Visible to customer" mean? When this option is enabled, the task appears for the customer in their event portal under Tasks. Tasks without this option enabled are visible internally only.
What is the difference between phase and status? The phase says when a task is due (before, during or after the event). The status says how far along it is (open, in progress, done or a custom status). You manage both under Settings → Status columns in separate cards.
Can I reopen a completed task? Yes. Click the checkbox in the task row again, or open the task and change the status manually.
I completed a recurring task — where is the next one? Univents creates it the moment you tick the task off, due on the next date in the series from today. It appears as an open task on the same event (or without an event) and in the workspace overview. If you reopen the completed task and tick it off again, no second one is created.
Can I assign a task to myself? Yes, with Assign to me above the people picker in the task form.